반응형
반응형


function convertJsonStr($row) {

if(is_null($row)) { 

return "{}"

}


$r = "{"

for($i = 0; $i < count($row); $i++) { 

$r .= "{"

$curr = $row[$i]; 

$end = count($curr); 

$ep = 0; 

foreach($curr as $k => $v) { 

$ep++; 

$r .= "\"" . $k . "\":\"" . $v . "\""

if($ep == $end) {

// 할일없음 

}

else {

$r .= ", "

}

}


$r .= $row[i]; 

$r .= "}"

if($i < count($row) - 1) {

$r .= ", "

}

}

$r .= "}"


return $r; 

}


반응형

'Program > PHP' 카테고리의 다른 글

API  (0) 2017.02.21
cannot create mssql.so on ubuntu 16.04 and php5.6  (0) 2017.02.17
PHP7 에서 PHP5.6 사용하기  (0) 2016.11.11
SQL Relay php connection  (0) 2016.07.17
PHP PHP EXCEL (PHP 엑셀 읽기 쓰기)  (0) 2016.01.21
반응형

http://ts-endingpopup.yjmgames.net:10574/service.php?packet_id=Ending&ssn=2&bundleid=com.bundleid.nohero.ios&market=12&country=EN


http://endingpopup.yjmgames.net:10574/service.php?packet_id=Ending&ssn=2&bundleid=com.bundleid.nohero.ios&market=12&country=EN


http://ts-notice.yjmgames.net:10574/service.php?packet_id=Notice&ssn=2&bundleid=com.bundleid.nohero.ios&market=12&country=EN


http://terms.yjmgames.net:10574/service.php?packet_id=Terms&ssn=2&bundleid=com.bundleid.nohero.ios&market=12&country=EN


http://ts-terms.yjmgames.net:10574/service.php?packet_id=Terms&ssn=2&bundleid=com.bundleid.nohero.ios&market=12&country=EN


http://ts-terms.yjmgames.net:10574/service.php?packet_id=Notice&ssn=2&bundleid=com.bundleid.nohero.ios&market=12&country=EN


http://notice.yjmgames.net:10574/service.php?packet_id=Notice&ssn=2&bundleid=com.bundleid.nohero.ios&market=12&country=EN


http://ts-iws.yjmgames.net:10574/state.php?packet_id=Iws&ssn=1&bundleid=com.bundleid.nohero.aos&market=2&version=1.01


http://52.78.177.195:10574/main_server.php?packet_id=Iws&ssn=1&bundleid=com.bundleid.nohero.aos&market=2&version=1.01

반응형
반응형


https://g3n1k.wordpress.com/2016/10/03/cannot-create-mssql-so-on-ubuntu-16-04-and-php5-6/


using php5.6 with freetds installed, and use ubuntu server 16.04

sudo add-apt-repository ppa:ondrej/php
sudo apt-get update
sudo apt-get install apache2 mysql-server php5.6 php5.6-mbstring php5.6-mcrypt php5.6-mysql php5.6-xml php5.6-cli libapache2-mod-php5.6 php5.6-gd freetds-common freetds-bin unixodbc php5.6-sybase php5.6-odbc cifs-utils php5.6-curl

how i know which mssql not working ???

  • try with phpinfo
    sudo nano /var/www/html/info.php
    # paste this code
    <?php phpinfo(); ?>

    open with browser, but i can find mssql there

  • try with php code
    sudo nano /var/www/html/ms.php
    # paste this code
    <?php
    $connection = mssql_connect('mssql-host', 'mssql-user', 'mssql-pass');
    if (!$connection) { die('Unable to connect!'); }
    if (!mssql_select_db('mssql-db', $connection)) { die('Unable to select database!');}
    $result = mssql_query('SELECT * FROM CAPACITY_INFO');
    while ($row = mssql_fetch_array($result)) { var_dump($row); }
    mssql_free_result($result);
    ?>
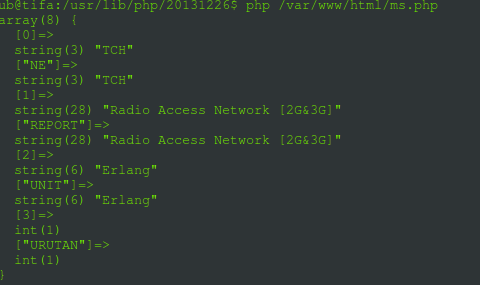
    # then try
    php /var/www/html/ms.php

    php-mssql

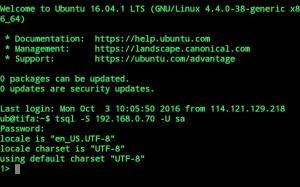
  • success try with tsql

tsql

  • cannot find mssql.so in /usr/lib/php/20131226/
    ls /usr/lib/php/20131226/ | grep mssql

 how to solve

# download the mssql.so
# this mssql get from ubuntu server 64 bit and php 5.6
https://drive.google.com/open?id=0BxV3_TI0LIeYT2pzVzBXRG1sVWM

#upload to your server
scp mssql.so user@server:/home/youruserhome

# move mssql.so to /usr/lib/php/20131226/
sudo mv /home/youruserhome/mssql.so /usr/lib/php/20131226/

# create mssql.ini
sudo nano sudo /etc/php/5.6/mods-available/mssql.ini

# insert this code
extension=mssql.so
# save and close

# copy config mssql.ini 
cd /etc/php/5.6/apache2/conf.d
sudo ln -s /etc/php/5.6/mods-available/mssql.ini 20-mssql.ini
cd /etc/php/5.6/cli/conf.d
sudo ln -s /etc/php/5.6/mods-available/mssql.ini 20-mssql.ini

# restart service apache2
sudo service apache2 restart

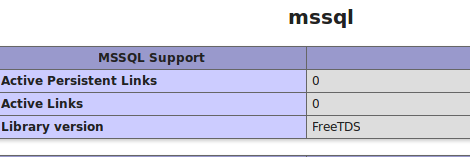
test again with phpinfo and script

mssql-phpinfo

success


반응형

'Program > PHP' 카테고리의 다른 글

php, mysql_fetch_assoc 결과를 json 문자열로 만들기  (0) 2017.10.28
API  (0) 2017.02.21
PHP7 에서 PHP5.6 사용하기  (0) 2016.11.11
SQL Relay php connection  (0) 2016.07.17
PHP PHP EXCEL (PHP 엑셀 읽기 쓰기)  (0) 2016.01.21
반응형

ubuntu 16.04LTS를 설치하면 php가 자동으로 최신버전인 7.0이 설치가 됩니다.


하지만 php 7버전에서 php 은닉기능인 AddType application/x-httpd-php이 잘 되지 않습니다.


이런식으로 php가 그대로 출력되어 깨집니다.


2일정도 방법을 찾다보니 5.6버전을 사용할 수 있는 방법이 있어 공유합니다.


1. apache proxy module을 중지시킵니다.


1
sudo a2dismod proxy_fcgi proxy
cs


2. php 5.6버전을 설치합니다.


reopsitory에 php5를 설치할 수 있도록 추가하고 업데이트 해줍니다.


1
2
3
sudo add-apt-repository ppa:ondrej/php
 
sudo apt-get update
cs


이제 php를 설치합니다. 5.6뿐만아니라 7.0도 같이 설치합니다.


1
sudo apt-get install php7.0 php5.6 php5.6-mysql php-gettext php5.6-mbstring php-xdebug libapache2-mod-php5.6
libapache2-mod-php7.0


이렇게 설치해 놓으면 필요에 따라 php 7과 php 5.6을 모두 사용 가능 합니다.


3. 사용할 php 선택하기


이 부분이 제일 중요합니다.


기존 php중지-> 새로운 php 시작 -> apache 재시작


순서로 진행하면 됩니다.


i) php5.6 사용하기


a)php7.0 중지


1
sudo a2dismod php7.0
cs


b)php5.6 사용


1
sudo a2enmod php5.6
cs


c)apache 재시작


1
sudo service apache2 restart
cs


이제 웹페이지를 실행해 보면 html속의 php가 정상 동작합니다.


ii) php7.0 사용하기


반대로 php7.0을 사용하려면 위와 반대로 명령을 내리면 됩니다.


a)php5.6 중지


1
sudo a2dismod php5.6
cs


b)php7.0 사용


1
sudo a2enmod php7.0
cs


c)apache 재시작


1
sudo service apache2 restart
cs


참고로 apache 서버가 아니고 CLI의 경우 아래의 코드를 입력하세요.


php 5.6 => php 7.0


1
sudo ln -sfn /usr/bin/php7.0 /etc/alternatives/php
cs


php 7.0 => php 5.6


1
sudo ln -sfn /usr/bin/php5.6 /etc/alternatives/php
cs


그리고 php의 경로가 /etc/php/ 밑에 버전별로 되어있습니다.


반응형

'Program > PHP' 카테고리의 다른 글

API  (0) 2017.02.21
cannot create mssql.so on ubuntu 16.04 and php5.6  (0) 2017.02.17
SQL Relay php connection  (0) 2016.07.17
PHP PHP EXCEL (PHP 엑셀 읽기 쓰기)  (0) 2016.01.21
ubuntu php에서 redis사용하기 - Predis  (0) 2015.05.28
반응형

공개커넥션 풀 프로그램 설명
http://tunelinux.pe.kr
http://database.sarang.net
2004.12.24
문태준

커넥션 풀은 프로그램(java, c, php 등등)과 db사이에서 db연결을 pool로 만들어 제어해주는 것입니다.
PHP에서 사용할 수 있는 공개 커넥션 풀 프로그램을 찾은 것이 있어서 여기 올립니다.
여기서는 간단한 사용법만 설명합니다. 자세한건 설명서와 옵션을 열심히 보고 고민해야 할듯.

구조는 다음과 같습니다.
db접속요청 -> 커넥션 풀 대몬 -> db 접속
db접속요청이 늘어나도 db 프로세스 갯수는 일정합니다. 커넥션 풀을 이용하여 자원관리를 하는 것입니다.

SQL Relay
http://sqlrelay.sourceforge.net/

SQL Relay is a persistent database connection pooling, proxying and load balancing system for Unix and Linux.

지원 DB는 다음과 같습니다.
* Oracle
* MySQL
* mSQL
* PostgreSQL

* Sybase
* MS SQL Server
* IBM DB2
* Interbase

* Sybase
* SQLite
* Lago
* ODBC

지원 api
* C
* C++
* Perl

* Python
* PHP
* Ruby

* Java
* TCL
* Zope

설치방법
http://sqlrelay.sourceforge.net/download.html 에서 SRPM을 이용하여 새로 RPM을 만들었습니다.
설치설명서를 참고하면 여러가지 방법을 이용할 수 있습니다. http://sqlrelay.sourceforge.net/sqlrelay/installing.html

SRPM을 설치하고 RPM을 만들때 여러가지 RPM파일을 요구합니다. 나오는 내용을 보고 설치해주면 됩니다.
gtk-devel 등등.

PHP를 사용하는데 소스로 설치했더니 php-config (php 확장모듈 만들때 쓰지요?) 를 못 찾더군요. 아마도 경로를 지정해주면 될듯한데 그냥 귀찮아서 php rpm을 설치하였습니다. 임시테스팅이 목적이었으므로.

설치시 불필요한 db, api를 명시해주지 않으면 rpm을 만들다가 에러가 납니다.

rpm -ta -without oracle -without zope sqlrelay-xxx.tar.gz

위와 같은 식입니다.

rpmbuild -without db2 -without freetds --without oracle -without zope sqlrelay.spec

나온 파일을 필요에 따라 설치합니다.

[root@kdu i386]# ls -1 
sqlrelay-0.35-1.i386.rpm
sqlrelay-client-devel-c-0.35-1.i386.rpm
sqlrelay-client-devel-c++-0.35-1.i386.rpm
sqlrelay-client-mysql-0.35-1.i386.rpm
sqlrelay-client-postgresql-0.35-1.i386.rpm
sqlrelay-client-runtime-c-0.35-1.i386.rpm
sqlrelay-client-runtime-c++-0.35-1.i386.rpm
sqlrelay-clients-0.35-1.i386.rpm
sqlrelay-config-gtk-0.35-1.i386.rpm
sqlrelay-doc-0.35-1.i386.rpm
sqlrelay-man-0.35-1.i386.rpm
sqlrelay-mysql-0.35-1.i386.rpm
sqlrelay-perl-0.35-1.i386.rpm
sqlrelay-php-0.35-1.i386.rpm

# rpm -ivh *.rpm

# rpm -ql sqlrelay | grep bin
/usr/bin/sqlr-cachemanager
/usr/bin/sqlr-listener
/usr/bin/sqlr-listener-debug
/usr/bin/sqlr-scaler
/usr/bin/sqlr-start
/usr/bin/sqlr-stop

# rpm -ql sqlrelay-php
/usr/lib/php4/sql_relay.so -> 이게 php모듈이지요.
/usr/share/pear/DB/sqlrelay.php

sqlrelay rpm으로 설치를 하면 /etc/sqlrelay.conf 파일을 만들어 설정합니다.
샘플은 /etc/sqlrelay.conf.example 입니다.

# ls /etc/sqlrelay.*
/etc/sqlrelay.conf /etc/sqlrelay.conf.example /etc/sqlrelay.dtd

아래와 같이 임시로 세팅했습니다.

mysql 의 경우 최소 수정할것 
id : instance id. sqlr-start 할때 필요함
dbase : mysql
connections : 초기 연결할 갯수
maxconnections : 최대 접속자

users 는 해당 api에서 접속할때 필요한 사용자, 비밀번호입니다. 나중 php소스코드보면 이해감.

connections는 커넥션 풀을 만들때 사용하는 db, user 등의 정보임.

<?xml version="1.0"?>
<!DOCTYPE instances SYSTEM "sqlrelay.dtd">

<instances>

<instance id="example" port="9000" socket="/tmp/example.socket" dbase="mysql" connections="20" maxconnections="500" maxqueuelength="5" growby="1" ttl="60" endofsession="commit" sessiontimeout="600" runasuser="nobody" runasgroup="nobody" cursors="5" authtier="listener" handoff="pass" deniedips="" allowedips="" debug="none">
<users>
<user user="user1" password="password1"/>
<user user="user2" password="password2"/>
<user user="user3" password="password3"/>
</users>
<connections>
<connection connectionid="db1" string="user=aaaat;password=aaaa;db=test;host=localhost;port=3306;socket=/var/lib/mysql/mysql.sock;" metric="1"/>
<connection connectionid="db2" string="user=aaaa;password=aaaa;db=test;host=localhost;port=3306;socket=/var/lib/mysql/mysql.sock;" metric="1"/>
<connection connectionid="db3" string="user=aaaa;password=aaaa;db=test;host=localhost;port=3306;socket=/var/lib/mysql/mysql.sock;" metric="1"/>

</connections>
</instance>

</instances>

이제 커넥션풀을 시작합니다.
# sqlr-start -id example -config /etc/sqlrelay.conf

# ps auxw | grep sqlr
nobody 20725 0.0 0.2 3600 1408 ? S 16:11 0:00 sqlr-listener -id example -config /etc/sqlrelay.conf
nobody 20728 0.0 0.3 4288 1720 ? S 16:11 0:00 sqlr-connection-mysql -id example -connectionid db1 -config /etc/sqlr
nobody 20731 0.0 0.3 4292 1720 ? S 16:11 0:00 sqlr-connection-mysql -id example -connectionid db1 -config /etc/sqlr
nobody 20734 0.0 0.3 4292 1720 ? S 16:11 0:00 sqlr-connection-mysql -id example -connectionid db1 -config /etc/sqlr
nobody 20785 0.0 0.3 4288 1720 ? S 16:11 0:00 sqlr-connection-mysql -id example -connectionid db5 -config /etc/sqlr
nobody 20787 0.0 0.2 3572 1368 ? S 16:11 0:00 sqlr-scaler -id example -config /etc/sqlrelay.conf
root 20793 0.0 0.2 3488 1072 ? S 16:11 0:00 sqlr-cachemanager

위에서 보듯이 몇가지 프로세서로 이루어집니다.

끝내기
# sqlr-stop 
id를 지정하지 않으면 몽땅 죽입니다.

mysqladmin pro 에서 보면 connections 만큼 mysql 과 연결되어있습니다.

샘플코드 php

# cat sql.php 
<?
dl("sql_relay.so");

$con=sqlrcon_alloc("localhost",9000,"","user1","password1",0,1) or die ("connect error");
$cur=sqlrcur_alloc($con);

echo "sendquery";
sqlrcur_sendQuery($cur,"select * from test");

#sqlrcur_sendFileQuery($cur,"/usr/local/myprogram/sql","myquery.sql");
echo "endsession";
sqlrcon_endSession($con);

sqlrcur_sendQuery($cur,"select * from test");
sqlrcon_endSession($con);

sqlrcur_free($cur);
sqlrcon_free($con);
?>

사이트에 나온 소스코드에서는 아래와 같이 나와있는데 " 를 넣어주지 않으면 에러가 납니다. ; 도 빠져있구요.
dl(sql_relay.so)

** 기타참고사이트
http://sqlb.sourceforge.net/frameset.html
The SQLB project is used to improve SQL requests to a database. It supports MySQL, PostgreSQL and Oracle(tm).

It is a set of deamon programs that make multiple permanent connection to one or more database when they start. Then an external program, previously linked with the sqlb client library, can send SQL requests to these deamons and get the result without any need to make a connection/disconnection. The SQLB PHP and Perl modules provided here with SQLB are some examples of such programs.

** phpschool 참고자료
http://www.phpschool.com/bbs2/inc_view.html?id=6888&code=tnt2 : Too many connections 에러와 DB pool 사용
http://www.phpschool.com/bbs2/inc_view.html?id=8132&code=tnt2 : 새로운 요청 처리 방법
http://www.phpschool.com/bbs2/inc_view.html?id=10093&code=tnt2 : 데이터베이스 풀링에 대한 sqlrelay 설치 문서

반응형

'Program > PHP' 카테고리의 다른 글

cannot create mssql.so on ubuntu 16.04 and php5.6  (0) 2017.02.17
PHP7 에서 PHP5.6 사용하기  (0) 2016.11.11
PHP PHP EXCEL (PHP 엑셀 읽기 쓰기)  (0) 2016.01.21
ubuntu php에서 redis사용하기 - Predis  (0) 2015.05.28
php 기본 내용  (0) 2015.05.27
반응형

http://blog.naver.com/ateon1/120202184897


출처 : http://blog.naver.com/blackfrost/40134487471

http://phpexcel.codeplex.com/

https://code.google.com/p/php-excel-reader/


2번째 방법은 아래의 링크이다. 


http://phpexcel.codeplex.com/


들어가서 해당CLASS를 다운 받고 쓰면 될것이다. 상당히 방대한 용량의 클래스인만큼, 거기에 나와 있는 40가지의 예제들처럼 엄청난 활용이 가능하다. 다만 PHP 5.2이상 버전인 환경에서만 사용되니 알아두기 바란다.


3번재 방법은 정말 간단하면서 깔끔하다.


http://code.google.com/p/php-excel-reader/


들어가보면 보이는 그림만으로 뭔지 눈치 챌것이다 위 CLASS처럼 여러가지상황에 맞춰 여러가지를 해줄수 있는것도 좋지만, 이건 정말 딱 엑셀을 업로드하면 엑셀을 정확히 읽어서 웹에 표시해준다. 간단하면서도 보통 필요한게 이런것이 아닐까 싶다.


필자는 1번째를 먼저 접하는 바람에 1번째 방법으로 삽질좀 했지만, 다른 분들은 상황에 맞게 2,3번째 방법으로 깔끔한 처리를 하기 바라는 의미에서 이 포스팅을 써본다.


http://spac.tistory.com/176


기존 엑셀 2003까지 버전은 확장자가 xls 로 생성되며 한시트에 최대 65,535 라인까지 처리할 수 있다.

그 이상의 행을 처리하려면 엑셀 2007 이상의 버전에서 xlsx 파일로 생성해야 한다. (100만 라인까지 가능)


기본 65,535라인을 넘는 데이터를 처리해야 할 경우 PHPExcel 클래스를 이용해 간단히 처리할 수 있다.

참고로 서버에 zip 라이브러리가 설치되어 있어야 한다.


먼저 PHPExcel 클래스를 다운로드 받자

http://www.codeplex.com/PHPExcel 에 방문하여 최신 버전을 내려받는다.


현재 기준으로 1.7.9 버전이 최신이다.

파일을 내려 받으면 PHPExcel_1.7.9_doc.zip 라는 파일이 받아진다.

압축을 풀어 서버에 업로드 한다. 


나의 경우에는 서버 계정의 _lib 디렉토리에 업로드 하고 디렉토리명을 PHPExcel 로 설정했다.


POST로 엑셀파일을 업로드 하는 폼 페이지는 생략 하겠다.

아래는 폼 페이지에서 파일을 업로드 하면 실행하는 파일이다.

(POST 로 날라오는 파일 폼 이름이  "upfile" 이라 정하면)


<?php

include $_SERVER["DOCUMENT_ROOT"]."/_lib/PHPExcel/Classes/PHPExcel.php"; 

$UpFile = $_FILES["upfile"];

$UpFileName = $UpFile["name"];


$UpFilePathInfo = pathinfo($UpFileName);
$UpFileExt = strtolower($UpFilePathInfo["extension"]);

if($UpFileExt != "xls" && $UpFileExt != "xlsx") {
echo "엑셀파일만 업로드 가능합니다. (xls, xlsx 확장자의 파일포멧)";
exit;
}

//-- 읽을 범위 필터 설정 (아래는 A열만 읽어오도록 설정함  => 속도를 중가시키기 위해)
class MyReadFilter implements PHPExcel_Reader_IReadFilter
{
public function readCell($column, $row, $worksheetName = '') {
// Read rows 1 to 7 and columns A to E only
if (in_array($column,range('A','A'))) {
return true;
}
return false;
}
}
$filterSubset = new MyReadFilter();

//업로드된 엑셀파일을 서버의 지정된 곳에 옮기기 위해 경로 적절히 설정
$upload_path = $_SERVER["DOCUMENT_ROOT"]."/Uploads/Excel_".date("Ymd");
$upfile_path = $upload_path."/".date("Ymd_His")."_".$UpFileName;
if(is_uploaded_file($UpFile["tmp_name"])) {

if(!move_uploaded_file($UpFile["tmp_name"],$upfile_path)) {
echo "업로드된 파일을 옮기는 중 에러가 발생했습니다.";
exit;
}

//파일 타입 설정 (확자자에 따른 구분)
$inputFileType = 'Excel2007';
if($UpFileExt == "xls") {
$inputFileType = 'Excel5';
}

//엑셀리더 초기화
$objReader = PHPExcel_IOFactory::createReader($inputFileType);

//데이터만 읽기(서식을 모두 무시해서 속도 증가 시킴)
$objReader->setReadDataOnly(true);

//범위 지정(위에 작성한 범위필터 적용)
$objReader->setReadFilter($filterSubset);

//업로드된 엑셀 파일 읽기
$objPHPExcel = $objReader->load($upfile_path);

//첫번째 시트로 고정
$objPHPExcel->setActiveSheetIndex(0);

//고정된 시트 로드
$objWorksheet = $objPHPExcel->getActiveSheet();

  //시트의 지정된 범위 데이터를 모두 읽어 배열로 저장
$sheetData = $objPHPExcel->getActiveSheet()->toArray(null,true,true,true);
$total_rows = count($sheetData);

foreach($sheetData as $rows) {

$fieldData = $rows["A"]; //A열값을 가져온다.
    /* 데이터 처리 */

}

}
.
.
?>


너무 큰 파일을 읽을 경우 메모리 제한을 풀어줘야 한다.

http://jmnote.com/wiki/PHP_%EB%A9%94%EB%AA%A8%EB%A6%AC_%EB%B6%80%EC%A1%B1

ini_set('memory_limit','-1');


http://forum.falinux.com/zbxe/index.php?document_srl=578422&mid=lecture_tip


PHPExcel를 사용해서 내용을 간단하게 입력해보고 다운로드 받을 수 있도록 테스트해볼 예정입니다.


1. 환경 설정


리눅스에서 Apache, PHP 가 설치되어 있어야합니다.

Ubuntu 에서는 apt-get 으로 apache2 와 php5 를 설치하면 됩니다.


윈도우에서는 apmsetup 을 설치하시면 간단합니다.

APMSETUP 홈페이지 주소는 아래와 같습니다.


홈페이지 주소 : http://www.apmsetup.com


리눅스 apache2 의 경우, 기본 홈 디렉토리가 /var/www/ 이며

윈도우에서 apmsetup 을 설치했을 경우, 기본 홈 디렉토리가 C:\APM_Setup\htdocs 입니다.


강좌는 윈도우에서 php_sample.php 라는 파일을 만들고 진행하였습니다.


2. 샘플 파일


PHPExcel 사이트에 받은 PHPExcel_1.7.8-with_documentation-msoffice_format.zip 파일의 압축을 풀고 html 기본 홈 디렉토리에 넣어줍니다.


윈도우에서 진행했으니, C:\APM_Setup\htdocs 안에 PHPExcel 폴더를 복사해줍니다.


아래는 미리 만들어진 기본 소스 입니다.


<?php
    require_once 'PHPExcel/Classes/PHPExcel.php';
    $objPHPExcel = new PHPExcel();
 
    header('Content-Type: application/vnd.ms-excel');
    header('Content-Disposition: attachment;filename=sample.xls');
    header('Cache-Control: max-age=0');
 
    $objWriter = PHPExcel_IOFactory::createWriter($objPHPExcel, 'Excel5');
    $objWriter->save('php://output');
 
    exit;
?>


require_once : PHPExcel 관련 PHP 파일을 포함시켜줘야합니다. PHPExcel 안에 Classes/PHPExcel.php 파일의 경로를 적어줍니다.


그 다음 header 에는 PHPExcel의 샘플 내용대로 엑셀 파일을 다운로드 받을 수 있도록 파일명을 정해줍니다.


위의 내용대로 만든 다음, 웹 브라우저에서 주소를 입력해서 테스트를 해보도록 합니다.


주소를 입력하면 아래 그림과 같이 sample.xls 파일을 다운로드 됩니다.


3. 기본 설정 추가


엑셀 파일이 다운로드 되는 것을 확인했으니, 이제 엑셀 파일의 내용을 넣어줄 차례입니다.


PHPExcel을 새로 만들어준다음,


$objPHPExcel = new PHPExcel();


사용이 가능하도록 시트를 설정해줍니다.


$sheet      = $objPHPExcel->getActiveSheet();


엑셀의 기본 글꼴을 정해주지 않으면, 영문쪽 글꼴로 선택됩니다. 윈도우 기본 폰트인 '맑은 고딕' 으로 설정해주기 위해서 아래와 같이 설정해 줍니다.


$sheet->getDefaultStyle()->getFont()->setName('맑은 고딕');


폰트 크기를 정하고 싶다면 뒤에 ->setSize를 넣어주면 됩니다.


$sheet->getDefaultStyle()->getFont()->setName('맑은 고딕')->setSize(10);


4. 내용 추가


간단하게 아래와 같이 내용을 추가해주기 위해서 PHP 소스를 추가하도록 하겠습니다.


처음에는 사용하게 될 시트를 선택해줘야 합니다.

아래 명령처럼 제일 첫 번째 시트를 선택하도록 합니다.


$sheetIndex = $objPHPExcel->setActiveSheetIndex(0);


$sheetIndex 에 내용을 추가하면 됩니다.

위의 '제목' 처럼 입력하면 아래와 같이 적어줍니다.


A1 셀에 내용을 '제 목' 이라고 입력해줍니다.


$sheetIndex->setCellValue('A1','제 목');


A1 ~ D1 셀 내용을 합쳐줍니다.


$sheetIndex->mergeCells('A1:D1');


A1 셀의 폰트와 스타일을 정해줍니다. 폰트 크기는 20으로 하고 두껍게 표시하도록 하였습니다.


$sheetIndex->getStyle('A1')->getFont()->setSize(20)->setBold(true);


A1 셀 내용이 중앙 정렬되도록 아래와 같이 입력해줍니다.


$sheetIndex->getStyle('A1')->getAlignment()->setHorizontal(PHPExcel_Style_Alignment::HORIZONTAL_CENTER);


위의 내용을 추가하고 웹 브라우저에서 주소를 입력하면 '제 목'을 볼 수 있습니다.


그 다음 내용을 추가해줄 차례입니다.

아래와 같이 셀주소와 내용을 입력해주면 됩니다.


$sheetIndex ->setCellValue('A2', '하나')
                ->setCellValue('B2', '둘')
                ->setCellValue('C2', '셋')
                ->setCellValue('D2', '넷');


위와 같이 작성한 후에 웹 브라우저에서 입력을 하면 아래 그림과 같은 화면을 볼 수 있습니다.


간단한 내용을 출력하는거지만, 생각외로 정해줄게 많은거 같습니다.


5. 전체 소스


<?php
    require_once 'PHPExcel/Classes/PHPExcel.php';
    $objPHPExcel = new PHPExcel();

    $sheet      = $objPHPExcel->getActiveSheet();

    // 글꼴
    $sheet->getDefaultStyle()->getFont()->setName('맑은 고딕');

    $sheetIndex = $objPHPExcel->setActiveSheetIndex(0);

    // 제목
    $sheetIndex->setCellValue('A1','제 목');
    $sheetIndex->mergeCells('A1:D1');
    $sheetIndex->getStyle('A1')->getFont()->setSize(20)->setBold(true);
    $sheetIndex->getStyle('A1')->getAlignment()->setHorizontal(PHPExcel_Style_Alignment::HORIZONTAL_CENTER);

    // 내용
    $sheetIndex ->setCellValue('A2', '하나')
                ->setCellValue('B2', '둘')
                ->setCellValue('C2', '셋')
                ->setCellValue('D2', '넷');

    header('Content-Type: application/vnd.ms-excel');
    header('Content-Disposition: attachment;filename=sample.xls');
    header('Cache-Control: max-age=0');
 
    $objWriter = PHPExcel_IOFactory::createWriter($objPHPExcel, 'Excel5');
    $objWriter->save('php://output');
 
    exit;
?>


참고용으로 좋음.

http://gyuha.tistory.com/454


반응형

'Program > PHP' 카테고리의 다른 글

PHP7 에서 PHP5.6 사용하기  (0) 2016.11.11
SQL Relay php connection  (0) 2016.07.17
ubuntu php에서 redis사용하기 - Predis  (0) 2015.05.28
php 기본 내용  (0) 2015.05.27
PHP PDO 예제  (0) 2015.05.08
반응형

Predis 모듈을 사용하면 php에서 redis를 사용할 수 있다.(phpredis 도 있음)


Predis를 설치하기 위해 pear을 설치

(c) sudo apt-get install php-pear

pear.nrk.io를 pear채널에 추가

(c) sudo pear channel-discover pear.nrk.io

nrk/Predis 설치

(c) sudo pear install nrk/Predis

Predis가 설치완료 되었다.
(여기서 삽질을 좀 했는데, 설치가 끝났다고 nrk나 Predis폴더가 만들어지지 않는다.
소스작업을 해보니 된다. =_=
난 시스템 개발자가 아니니 그냥 pass)

이제 소스 작업을 시작해 보자

<?
require_once "Predis/Autoloader.php";
Predis\Autoloader::register();
$redis = new Predis\Client();
$redis->set('foo', 'bar');
$value = $redis->get('foo');
echo $value;
?>

화면에 bar 가 나오면 OK


반응형

'Program > PHP' 카테고리의 다른 글

PHP7 에서 PHP5.6 사용하기  (0) 2016.11.11
SQL Relay php connection  (0) 2016.07.17
PHP PHP EXCEL (PHP 엑셀 읽기 쓰기)  (0) 2016.01.21
php 기본 내용  (0) 2015.05.27
PHP PDO 예제  (0) 2015.05.08
반응형

1. 클래스를 생성할때 클래스에 인수를 넘기는게 있던데 어떻게 받는건지;;

예를들어서 $test = new Class("test");

이런식으로 인수를 넘기면 어떻게 받는지 궁금하구요


 - 객체 생성시 클래스로 넘기는 인수는 PHP5 의 경우 클래스내에 __construct() 라는 생성자 함수로 넘어가게 되며 PHP4 는 클래스 이름과 동일한 이름의 함수가 생성자 역활을 하므로 해당 함수로 넘어가게 됩니다.


예)

class test {

    function __construct($a) {

        echo $a;

    }

}


$t = new test('Hello');


객체 생성과 함께 화면에 Hello 라고 출력됩니다.


2. 클래스 함수등에 엠퍼센트(&)를 붙여서 쓰는게 있던데 이건 어디에 쓰는건지 모르겠어요

예를 들어서 $test->&test("test");

이런건 어디에 쓰고 또 어떻게 쓰는건지 알려주세요


- 우선 질문에 적으신 $test->&test("test") 는 문법 오류를 발생시킵니다. 엠퍼센트가 위치할 곳은 맨 앞쪽입니다.

&$test->test(); 와 같이요. 이 같은 사용법은 약간은 다르지만 C 에서 포인터와 비슷합니다. 즉 어떠한 값이 복사가 되는 것이 아니고 그 값을 가리키는 새로운 이름이 생성되는 것과 같습니다. 아래 예를 보세요.


$a = 1;

$b = $a;


위와 같이 했을 때 $b 가 같은 값인 1을 가지고 있긴 하지만 메모리 상에서는 다른 값으로 처리됩니다. 즉 $b 변수에 값이 대입될 때 $a 에 있는 값과 동일한 값을 메모리상 새로운 공간에 저장을 한다는 것이죠. 하지만...


$a = 1;

$b = &$a;


위와 같이 처리하면 $a 와 $b 는 메모리 위치상 같은 공간의 값을 가리키고 있게 됩니다.

그럼 엠퍼센트가 함수에 붙었을 경우는...


class test {

    private $a = 1;

    public function &aa() {

        echo $this->$a;

    }

}


$t = new test();

$d = &$t->aa();

echo $d; // 1 출력


$d++;


echo $t->aa(); // 2 출력


위 예제의 결과와 같이 $d 변수에 ++ 를 해주니 실제 객체 안에 있는 $a 멤버변수의 값이 변환되고 있습니다. 만약 위 예제에서 & 를 제외한다면 두번째 출력 값은 1 이 될 것 입니다.


그런데 주의하실 점은 위 예제와 같이 메소드를 통해 참조전달을 사용하시려면 메소드명 앞에도 엠퍼센트를 붙여줘야 한다는 것과 class 안에서 private 이나 protected 로 선언된 변수라도 위와 같이 사용을 하면 외부에서 접근이 가능하다는 것에 주의하셔야 합니다.


3. 클래스에서 ::이건 또 어디에 쓰이는지;;

가끔 보면 $test::test();이렇게 되어있던데 이건 어떻게 쓰고 왜 쓰는지 알려주세요


- :: 는 하나의 실행 연산자인데요. class 내에 메소드를 사용하려면 class 명을 이용하여 객체를 생성하고 해당 객체를 이용해서 메소드를 실행하게 됩니다. 하지만 가끔 어떤 class 내에 메쏘드 기능이 잠시 필요할 수도 있겠죠? 이런 상황에서 :: 를 쓰면 가장 좋습니다. 아래 예를 보세요.


class test {

    private $num = 1;

    public function aa() {

        echo "Hello!";

    }

    public function bb() {

        echo $this->num;

    }

}


우선 일반적인 방법으로 aa() 메소드를 실행하려면...


$t = new test();

$t->aa();


이렇게 해야 합니다. 하지만 :: 연산자를 사용하면 아래와 같이 한줄로 끝나죠.


test::aa();


여기서 중요한 것은 위와 같이 실행했을 경우 실제 test 객체는 생성되지 않습니다. 그 말은 $num 이란 멤버 변수 역시 생성되지 않는 다는 것이죠. 그래서 test::bb() 와 같이 bb() 메소드를 실행하면 에러가 출력됩니다. 이 점만 기억하시면 별문제 없이 사용하실 수 있겠네요.


4. static정적 멤버변수는 어디에 쓰이는지 궁금해요.


- 이 변수는 객체가 여러번 생성되도 모든 객체가 공유할 수 있는 값을 저장하는데 사용하시면 됩니다. 딱히 떠오르는 예제는 없지만 싱글턴 이라는 디자인패턴이 있습니다.


이 패턴의 중요 포인트는 어떤 프로그램에서 a라는 클래스를 여러번 이용할 경우 객체가 여러개 생성되게 됩니다. 이때 만약 처음으로 생성되는 객체를 프로그램 끝까지 사용할 수 있도록 하면 메모리 사용량도 줄일 수 있고 편리하겠다 하는 아이디어에서 나온 패턴입니다. 이 패턴을 구성할 때 사용되는 것이 static 변수 입니다.


class test {

    private static $instance = null;


    public static function getInstance() {

        if(self::$instance == null) {

            self::$instance = new self;

        }

        return self::$instance;

    }


    public function go() {

        echo 'Hello!';

    }

}


위 예제는 간단한 싱글턴 구조입니다. 이 클래스를 사용할 때는 이전의 new 키워드가 아닌 :: 연산자를 이용하여 getInstance() 를 바로 실행 함으로써 객체를 생성하게 됩니다.


$t = test::getInstance();


위와 같이 생성을 하게 되면 getInstance() 메소드 내용대로 현재 객체가 생성되어 있는지를 확인하고 생성되어 있지 않을 경우 새로 생성하여 반환하며 생성되어 있다면 해당 객체를 반환합니다. 즉 전체 프로그램에서 100번을 사용해도 실제 생성되는 객체는 1개라는 것이죠.


이와 같이 프로그램이 종료되기 직전까지 꾸준히 필요한 값을 저장하는 용도로 사용하기에는 딱 좋겠죠? 

반응형

'Program > PHP' 카테고리의 다른 글

PHP7 에서 PHP5.6 사용하기  (0) 2016.11.11
SQL Relay php connection  (0) 2016.07.17
PHP PHP EXCEL (PHP 엑셀 읽기 쓰기)  (0) 2016.01.21
ubuntu php에서 redis사용하기 - Predis  (0) 2015.05.28
PHP PDO 예제  (0) 2015.05.08
반응형


Example#1 Connecting to MySQL

<?php
$dbh 
= new PDO('mysql:host=localhost;dbname=test'$user$pass);
?>

Example#2 Handling connection errors
<?php
try {
   
$dbh = new PDO('mysql:host=localhost;dbname=test'$user$pass);
   foreach (
$dbh->query('SELECT * from FOO') as $row) {
      
print_r($row);
   }
   
$dbh null;
} catch (
PDOException $e) {
   print 
"Error!: " $e->getMessage() . "<br/>";
   die();
}
?>

Example#3 Closing a connection
<?php
$dbh 
= new PDO('mysql:host=localhost;dbname=test'$user$pass);
// use the connection here


// and now we're done; close it
$dbh null;
?>

Example#4 Persistent connections

<?php
$dbh 
= new PDO('mysql:host=localhost;dbname=test'$user$pass, array(
  
PDO::ATTR_PERSISTENT => true
));
?>

Example#5 Executing a batch in a transaction
<?php
try {
  
$dbh = new PDO('odbc:SAMPLE''db2inst1''ibmdb2'
      array(
PDO::ATTR_PERSISTENT => true));
  echo 
"Connected\n";
  
$dbh->setAttribute(PDO::ATTR_ERRMODEPDO::ERRMODE_EXCEPTION);

  
$dbh->beginTransaction();
  
$dbh->exec("insert into staff (id, first, last) values (23, 'Joe', 'Bloggs')");
  
$dbh->exec("insert into salarychange (id, amount, changedate) 
      values (23, 50000, NOW())"
);
  
$dbh->commit();
  
} catch (
Exception $e) {
  
$dbh->rollBack();
  echo 
"Failed: " $e->getMessage();
}
?>

Example#6 Repeated inserts using prepared statements
<?php
$stmt 
$dbh->prepare("INSERT INTO REGISTRY (name, value) VALUES (:name, :value)");
$stmt->bindParam(':name'$name);
$stmt->bindParam(':value'$value);

// insert one row
$name 'one';
$value 1;
$stmt->execute();

// insert another row with different values
$name 'two';
$value 2;
$stmt->execute();
?>

Example#7 Repeated inserts using prepared statements
<?php
$stmt 
$dbh->prepare("INSERT INTO REGISTRY (name, value) VALUES (?, ?)");
$stmt->bindParam(1$name);
$stmt->bindParam(2$value);

// insert one row
$name 'one';
$value 1;
$stmt->execute();

// insert another row with different values
$name 'two';
$value 2;
$stmt->execute();
?>

Example#8 Fetching data using prepared statements
<?php
$stmt 
$dbh->prepare("SELECT * FROM REGISTRY where name = ?");
if (
$stmt->execute(array($_GET['name']))) {
  while (
$row $stmt->fetch()) {
    
print_r($row);
  }
}
?>

Example#9 Calling a stored procedure with an output parameter

<?php
$stmt 
$dbh->prepare("CALL sp_returns_string(?)");
$stmt->bindParam(1$return_valuePDO::PARAM_STR4000); 

// call the stored procedure
$stmt->execute();

print 
"procedure returned $return_value\n";
?>

Example#10 Calling a stored procedure with an input/output parameter

<?php
$stmt 
$dbh->prepare("CALL sp_takes_string_returns_string(?)");
$value 'hello';
$stmt->bindParam(1$valuePDO::PARAM_STR|PDO::PARAM_INPUT_OUTPUT4000); 

// call the stored procedure
$stmt->execute();

print 
"procedure returned $value\n";
?>

Example#11 Invalid use of placeholder

<?php
$stmt 
$dbh->prepare("SELECT * FROM REGISTRY where name LIKE '%?%'");
$stmt->execute(array($_GET['name']));

// placeholder must be used in the place of the whole value
$stmt $dbh->prepare("SELECT * FROM REGISTRY where name LIKE ?");
$stmt->execute(array("%$_GET[name]%"));
?>


반응형

'Program > PHP' 카테고리의 다른 글

PHP7 에서 PHP5.6 사용하기  (0) 2016.11.11
SQL Relay php connection  (0) 2016.07.17
PHP PHP EXCEL (PHP 엑셀 읽기 쓰기)  (0) 2016.01.21
ubuntu php에서 redis사용하기 - Predis  (0) 2015.05.28
php 기본 내용  (0) 2015.05.27

+ Recent posts

반응형