반응형
반응형

http://worksp.tistory.com/10


유니티 5.3.1 f1 로 버전업 했더니, NGUI 에서 범상치 않은 워닝을 내뱉었다.


1
2
3
Assets/NGUI/Examples/Scripts/Other/LoadLevelOnClick.cs(15,37): 
warning CS0618: `UnityEngine.Application.LoadLevel(string)' is obsolete: 
`Use SceneManager.LoadScene'

cs


Application.LoadLevel 로 씬 이동 하던 것을 SceneManager.LoadScene 으로 사용하란다.


그래서 유니티의 바람대로 SceneManager.LoadScene 으로 고쳐썼더니 네임스페이스가 없다고 한다....


검색해보니 UnityEngine.SceneManagement 라는 네임 스페이스가 추가된 듯.. 


1
using UnityEngine.SceneManagement;
cs


위와 같이 네임스페이스를 추가하니 정상적으로 작동한다.


알고보니 유니티 5.3에서 멀티 씬 편집(Multi-Scene Editing) 을 지원한다고 한다.


아래와 같이 프로젝트 뷰 에서 오른쪽 클릭을 한 후, Open Scene Additive 를 클릭하면...


▼ 이렇게 하이라키 뷰에 여러 씬이 열린다.


또한 SceneManager 추가되었고, 덕분에 자주쓰는 메소드들도 거의 다 구식이 되어버렸다.


변경점은 다음과 같다. 


1
2
3
4
5
6
7
8
9
10
11
12
13
14
15
16
17
18
19
20
21
22
23
24
25
26
27
28
29
30
31
32
33
34
35
36
37
38
39
40
41
42
43
44
45
46
47
48
49
50
51
52
53
54
55
56
// old
Application.LoadLevel(0);                                       // 로드. 
Application.LoadLevel("SceneName");
AsyncOperation ao = Application.LoadLevelAsync(0);              // 로드. (비동기)
AsyncOperation ao = Application.LoadLevelAsync("SceneName");
Application.LoadLevelAdditive(0);                               // 씬 병합 추가. 
Application.LoadLevelAdditive("SceneName");
Application.LoadLevelAdditiveAsync(0);                          // 씬 병합 추가. (비동기)
Application.LoadLevelAdditiveAsync("SceneName");
Application.UnloadLevel(0);                                     // 언로드. 
Application.UnloadLevel("SceneName");
Application.levelCount;                                // BuildSetting 에 등록 된 씬 개수. 
Application.loadedLevel;                                        // 현재 씬 인덱스. 
Application.loadedLevelName;                                    // 현재 씬 이름. 
 
// 5.3
SceneManager.LoadScene(0);                                      // 로드. 
SceneManager.LoadScene("SceneName");
AsyncOperation ao = SceneManager.LoadSceneAsync(0);             // 로드. (비동기)
AsyncOperation ao = SceneManager.LoadSceneAsync("SceneName");
SceneManager.LoadScene(0, LoadSceneMode.Additive);              // 씬 병합 추가. 
SceneManager.LoadScene("SceneName", LoadSceneMode.Additive);
SceneManager.LoadSceneAsync(0, LoadSceneMode.Additive);         // 씬 병합 추가. (비동기)
SceneManager.LoadSceneAsync("SceneName", LoadSceneMode.Additive);
SceneManager.UnloadScene(0);                                    // 언로드. 
SceneManager.UnloadScene("SceneName");
SceneManager.sceneCount;                                        // 현재 로드 된 씬 개수. 
SceneManager.sceneCountInBuildSettings;                // BuildSetting 에 등록 된 씬 개수. 
SceneManager.GetActiveScene().buildIndex;                       // 현재 씬 인덱스. 
SceneManager.GetActiveScene().name;                             // 현재 씬 이름. 
 
// 씬 정보 조회. 
Scene activeScene = SceneManager.GetActiveScene();
Scene scene1 = SceneManager.GetSceneAt(0);
Scene scene2 = SceneManager.GetSceneByName("SceneName");
Scene scene3 = SceneManager.GetSceneByPath("Assets/SceneName.unity");
Scene[] loadedScenes = SceneManager.GetAllScenes();
 
// Scene 구조체. 
int buildIndex;
string name;
string path;
bool isLoaded;
bool isDirty;       // 씬을 변경(수정)했는지 여부. 
int rootCount;      // 씬의 Root에 있는 GameObject 개수. 
bool IsValid();     // 유효한 씬인지 여부. 
 
// 기타. 
Scene scene = gameObject.scene;                 // 게임오브젝트가 속해있는 씬을 가져오기. 
GameObject go = new GameObject("New Object");   // 게임오브젝트를 생성하면 현재 씬에 추가 됨. 
SceneManager.MoveGameObjectToScene(go, scene);      // 게임오브젝트를 다른 씬으로 이동. 
SceneManager.MergeScenes(sourceScene, destinationScene);    // 씬을 병합. 
 
// SceneManager.Get~() 으로 가져올 수 있는 것은 로드가 끝난 씬만 가능. 
Scene scene = SceneManager.GetSceneByName("SceneName");
bool isValid = scene.IsValid();     // false 가 리턴 됨.
cs


정리하다보니 꽤 많네;;;


아, 그리고 DontDestroyOnLoad 메소드 비스므리 한 것은 아예 없었는데,


Tips 를 참조해 보면, DontDestroyOnLoad 의 사용은 피하는 것이 좋고, Manager 씬을 만들어서 병합하는 것이 좋다고 한다.


앞으로 개발 시 참고해야 할 사항인 것 같다.


PS. Unity 5.3 에서는 과금 플러그인을 이용할 필요가 없을 수도 있겠다.


Unity Service Tab 에서 여러가지를(Unity Ads, Analytics, Cloud Build, In-App Purchasing, Multiplayer) 지원함..


반응형

'Program > Unity' 카테고리의 다른 글

google sdk  (0) 2017.02.23
Facebook - 로그인 - 친구리스트 불러오기  (0) 2017.02.23
반응형


https://g3n1k.wordpress.com/2016/10/03/cannot-create-mssql-so-on-ubuntu-16-04-and-php5-6/


using php5.6 with freetds installed, and use ubuntu server 16.04

sudo add-apt-repository ppa:ondrej/php
sudo apt-get update
sudo apt-get install apache2 mysql-server php5.6 php5.6-mbstring php5.6-mcrypt php5.6-mysql php5.6-xml php5.6-cli libapache2-mod-php5.6 php5.6-gd freetds-common freetds-bin unixodbc php5.6-sybase php5.6-odbc cifs-utils php5.6-curl

how i know which mssql not working ???

  • try with phpinfo
    sudo nano /var/www/html/info.php
    # paste this code
    <?php phpinfo(); ?>

    open with browser, but i can find mssql there

  • try with php code
    sudo nano /var/www/html/ms.php
    # paste this code
    <?php
    $connection = mssql_connect('mssql-host', 'mssql-user', 'mssql-pass');
    if (!$connection) { die('Unable to connect!'); }
    if (!mssql_select_db('mssql-db', $connection)) { die('Unable to select database!');}
    $result = mssql_query('SELECT * FROM CAPACITY_INFO');
    while ($row = mssql_fetch_array($result)) { var_dump($row); }
    mssql_free_result($result);
    ?>
    # then try
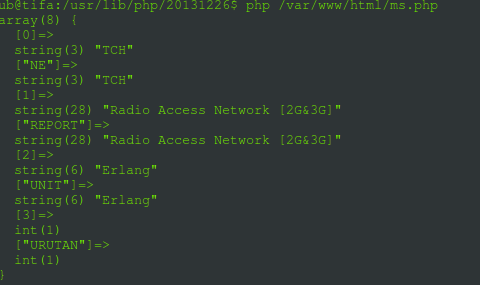
    php /var/www/html/ms.php

    php-mssql

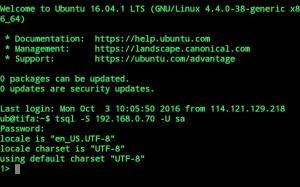
  • success try with tsql

tsql

  • cannot find mssql.so in /usr/lib/php/20131226/
    ls /usr/lib/php/20131226/ | grep mssql

 how to solve

# download the mssql.so
# this mssql get from ubuntu server 64 bit and php 5.6
https://drive.google.com/open?id=0BxV3_TI0LIeYT2pzVzBXRG1sVWM

#upload to your server
scp mssql.so user@server:/home/youruserhome

# move mssql.so to /usr/lib/php/20131226/
sudo mv /home/youruserhome/mssql.so /usr/lib/php/20131226/

# create mssql.ini
sudo nano sudo /etc/php/5.6/mods-available/mssql.ini

# insert this code
extension=mssql.so
# save and close

# copy config mssql.ini 
cd /etc/php/5.6/apache2/conf.d
sudo ln -s /etc/php/5.6/mods-available/mssql.ini 20-mssql.ini
cd /etc/php/5.6/cli/conf.d
sudo ln -s /etc/php/5.6/mods-available/mssql.ini 20-mssql.ini

# restart service apache2
sudo service apache2 restart

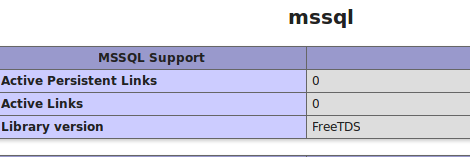
test again with phpinfo and script

mssql-phpinfo

success


반응형

'Program > PHP' 카테고리의 다른 글

php, mysql_fetch_assoc 결과를 json 문자열로 만들기  (0) 2017.10.28
API  (0) 2017.02.21
PHP7 에서 PHP5.6 사용하기  (0) 2016.11.11
SQL Relay php connection  (0) 2016.07.17
PHP PHP EXCEL (PHP 엑셀 읽기 쓰기)  (0) 2016.01.21
반응형

ubuntu 16.04LTS를 설치하면 php가 자동으로 최신버전인 7.0이 설치가 됩니다.


하지만 php 7버전에서 php 은닉기능인 AddType application/x-httpd-php이 잘 되지 않습니다.


이런식으로 php가 그대로 출력되어 깨집니다.


2일정도 방법을 찾다보니 5.6버전을 사용할 수 있는 방법이 있어 공유합니다.


1. apache proxy module을 중지시킵니다.


1
sudo a2dismod proxy_fcgi proxy
cs


2. php 5.6버전을 설치합니다.


reopsitory에 php5를 설치할 수 있도록 추가하고 업데이트 해줍니다.


1
2
3
sudo add-apt-repository ppa:ondrej/php
 
sudo apt-get update
cs


이제 php를 설치합니다. 5.6뿐만아니라 7.0도 같이 설치합니다.


1
sudo apt-get install php7.0 php5.6 php5.6-mysql php-gettext php5.6-mbstring php-xdebug libapache2-mod-php5.6
libapache2-mod-php7.0


이렇게 설치해 놓으면 필요에 따라 php 7과 php 5.6을 모두 사용 가능 합니다.


3. 사용할 php 선택하기


이 부분이 제일 중요합니다.


기존 php중지-> 새로운 php 시작 -> apache 재시작


순서로 진행하면 됩니다.


i) php5.6 사용하기


a)php7.0 중지


1
sudo a2dismod php7.0
cs


b)php5.6 사용


1
sudo a2enmod php5.6
cs


c)apache 재시작


1
sudo service apache2 restart
cs


이제 웹페이지를 실행해 보면 html속의 php가 정상 동작합니다.


ii) php7.0 사용하기


반대로 php7.0을 사용하려면 위와 반대로 명령을 내리면 됩니다.


a)php5.6 중지


1
sudo a2dismod php5.6
cs


b)php7.0 사용


1
sudo a2enmod php7.0
cs


c)apache 재시작


1
sudo service apache2 restart
cs


참고로 apache 서버가 아니고 CLI의 경우 아래의 코드를 입력하세요.


php 5.6 => php 7.0


1
sudo ln -sfn /usr/bin/php7.0 /etc/alternatives/php
cs


php 7.0 => php 5.6


1
sudo ln -sfn /usr/bin/php5.6 /etc/alternatives/php
cs


그리고 php의 경로가 /etc/php/ 밑에 버전별로 되어있습니다.


반응형

'Program > PHP' 카테고리의 다른 글

API  (0) 2017.02.21
cannot create mssql.so on ubuntu 16.04 and php5.6  (0) 2017.02.17
SQL Relay php connection  (0) 2016.07.17
PHP PHP EXCEL (PHP 엑셀 읽기 쓰기)  (0) 2016.01.21
ubuntu php에서 redis사용하기 - Predis  (0) 2015.05.28
반응형

Python

Using the Python DB API, don't do this:

# Do NOT do it this way.
cmd = "update people set name='%s' where id='%s'" % (name, id)
curs.execute(cmd)

Instead, do this:

cmd = "update people set name=%s where id=%s"
curs.execute(cmd, (name, id))

Note that the placeholder syntax depends on the database you are using.

'qmark'         Question mark style,
                e.g. '...WHERE name=?'
'numeric'       Numeric, positional style,
                e.g. '...WHERE name=:1'
'named'         Named style,
                e.g. '...WHERE name=:name'
'format'        ANSI C printf format codes,
                e.g. '...WHERE name=%s'
'pyformat'      Python extended format codes,
                e.g. '...WHERE name=%(name)s'

The values for the most common databases are:

>>> import MySQLdb; print MySQLdb.paramstyle
format
>>> import psycopg2; print psycopg2.paramstyle
pyformat
>>> import sqlite3; print sqlite3.paramstyle
qmark

So if you are using MySQL or PostgreSQL, use %s (even for numbers and other non-string values!) and if you are using SQLite use ?


반응형
반응형

ImportError: No module named 'MySQLdb'


파이썬 3.5에서는 아직 지원하지 않는다.

mysqlclient를 사용하자


apt-get install libmysqlclient-dev

pip3 install mysqlclient

반응형
반응형

공개커넥션 풀 프로그램 설명
http://tunelinux.pe.kr
http://database.sarang.net
2004.12.24
문태준

커넥션 풀은 프로그램(java, c, php 등등)과 db사이에서 db연결을 pool로 만들어 제어해주는 것입니다.
PHP에서 사용할 수 있는 공개 커넥션 풀 프로그램을 찾은 것이 있어서 여기 올립니다.
여기서는 간단한 사용법만 설명합니다. 자세한건 설명서와 옵션을 열심히 보고 고민해야 할듯.

구조는 다음과 같습니다.
db접속요청 -> 커넥션 풀 대몬 -> db 접속
db접속요청이 늘어나도 db 프로세스 갯수는 일정합니다. 커넥션 풀을 이용하여 자원관리를 하는 것입니다.

SQL Relay
http://sqlrelay.sourceforge.net/

SQL Relay is a persistent database connection pooling, proxying and load balancing system for Unix and Linux.

지원 DB는 다음과 같습니다.
* Oracle
* MySQL
* mSQL
* PostgreSQL

* Sybase
* MS SQL Server
* IBM DB2
* Interbase

* Sybase
* SQLite
* Lago
* ODBC

지원 api
* C
* C++
* Perl

* Python
* PHP
* Ruby

* Java
* TCL
* Zope

설치방법
http://sqlrelay.sourceforge.net/download.html 에서 SRPM을 이용하여 새로 RPM을 만들었습니다.
설치설명서를 참고하면 여러가지 방법을 이용할 수 있습니다. http://sqlrelay.sourceforge.net/sqlrelay/installing.html

SRPM을 설치하고 RPM을 만들때 여러가지 RPM파일을 요구합니다. 나오는 내용을 보고 설치해주면 됩니다.
gtk-devel 등등.

PHP를 사용하는데 소스로 설치했더니 php-config (php 확장모듈 만들때 쓰지요?) 를 못 찾더군요. 아마도 경로를 지정해주면 될듯한데 그냥 귀찮아서 php rpm을 설치하였습니다. 임시테스팅이 목적이었으므로.

설치시 불필요한 db, api를 명시해주지 않으면 rpm을 만들다가 에러가 납니다.

rpm -ta -without oracle -without zope sqlrelay-xxx.tar.gz

위와 같은 식입니다.

rpmbuild -without db2 -without freetds --without oracle -without zope sqlrelay.spec

나온 파일을 필요에 따라 설치합니다.

[root@kdu i386]# ls -1 
sqlrelay-0.35-1.i386.rpm
sqlrelay-client-devel-c-0.35-1.i386.rpm
sqlrelay-client-devel-c++-0.35-1.i386.rpm
sqlrelay-client-mysql-0.35-1.i386.rpm
sqlrelay-client-postgresql-0.35-1.i386.rpm
sqlrelay-client-runtime-c-0.35-1.i386.rpm
sqlrelay-client-runtime-c++-0.35-1.i386.rpm
sqlrelay-clients-0.35-1.i386.rpm
sqlrelay-config-gtk-0.35-1.i386.rpm
sqlrelay-doc-0.35-1.i386.rpm
sqlrelay-man-0.35-1.i386.rpm
sqlrelay-mysql-0.35-1.i386.rpm
sqlrelay-perl-0.35-1.i386.rpm
sqlrelay-php-0.35-1.i386.rpm

# rpm -ivh *.rpm

# rpm -ql sqlrelay | grep bin
/usr/bin/sqlr-cachemanager
/usr/bin/sqlr-listener
/usr/bin/sqlr-listener-debug
/usr/bin/sqlr-scaler
/usr/bin/sqlr-start
/usr/bin/sqlr-stop

# rpm -ql sqlrelay-php
/usr/lib/php4/sql_relay.so -> 이게 php모듈이지요.
/usr/share/pear/DB/sqlrelay.php

sqlrelay rpm으로 설치를 하면 /etc/sqlrelay.conf 파일을 만들어 설정합니다.
샘플은 /etc/sqlrelay.conf.example 입니다.

# ls /etc/sqlrelay.*
/etc/sqlrelay.conf /etc/sqlrelay.conf.example /etc/sqlrelay.dtd

아래와 같이 임시로 세팅했습니다.

mysql 의 경우 최소 수정할것 
id : instance id. sqlr-start 할때 필요함
dbase : mysql
connections : 초기 연결할 갯수
maxconnections : 최대 접속자

users 는 해당 api에서 접속할때 필요한 사용자, 비밀번호입니다. 나중 php소스코드보면 이해감.

connections는 커넥션 풀을 만들때 사용하는 db, user 등의 정보임.

<?xml version="1.0"?>
<!DOCTYPE instances SYSTEM "sqlrelay.dtd">

<instances>

<instance id="example" port="9000" socket="/tmp/example.socket" dbase="mysql" connections="20" maxconnections="500" maxqueuelength="5" growby="1" ttl="60" endofsession="commit" sessiontimeout="600" runasuser="nobody" runasgroup="nobody" cursors="5" authtier="listener" handoff="pass" deniedips="" allowedips="" debug="none">
<users>
<user user="user1" password="password1"/>
<user user="user2" password="password2"/>
<user user="user3" password="password3"/>
</users>
<connections>
<connection connectionid="db1" string="user=aaaat;password=aaaa;db=test;host=localhost;port=3306;socket=/var/lib/mysql/mysql.sock;" metric="1"/>
<connection connectionid="db2" string="user=aaaa;password=aaaa;db=test;host=localhost;port=3306;socket=/var/lib/mysql/mysql.sock;" metric="1"/>
<connection connectionid="db3" string="user=aaaa;password=aaaa;db=test;host=localhost;port=3306;socket=/var/lib/mysql/mysql.sock;" metric="1"/>

</connections>
</instance>

</instances>

이제 커넥션풀을 시작합니다.
# sqlr-start -id example -config /etc/sqlrelay.conf

# ps auxw | grep sqlr
nobody 20725 0.0 0.2 3600 1408 ? S 16:11 0:00 sqlr-listener -id example -config /etc/sqlrelay.conf
nobody 20728 0.0 0.3 4288 1720 ? S 16:11 0:00 sqlr-connection-mysql -id example -connectionid db1 -config /etc/sqlr
nobody 20731 0.0 0.3 4292 1720 ? S 16:11 0:00 sqlr-connection-mysql -id example -connectionid db1 -config /etc/sqlr
nobody 20734 0.0 0.3 4292 1720 ? S 16:11 0:00 sqlr-connection-mysql -id example -connectionid db1 -config /etc/sqlr
nobody 20785 0.0 0.3 4288 1720 ? S 16:11 0:00 sqlr-connection-mysql -id example -connectionid db5 -config /etc/sqlr
nobody 20787 0.0 0.2 3572 1368 ? S 16:11 0:00 sqlr-scaler -id example -config /etc/sqlrelay.conf
root 20793 0.0 0.2 3488 1072 ? S 16:11 0:00 sqlr-cachemanager

위에서 보듯이 몇가지 프로세서로 이루어집니다.

끝내기
# sqlr-stop 
id를 지정하지 않으면 몽땅 죽입니다.

mysqladmin pro 에서 보면 connections 만큼 mysql 과 연결되어있습니다.

샘플코드 php

# cat sql.php 
<?
dl("sql_relay.so");

$con=sqlrcon_alloc("localhost",9000,"","user1","password1",0,1) or die ("connect error");
$cur=sqlrcur_alloc($con);

echo "sendquery";
sqlrcur_sendQuery($cur,"select * from test");

#sqlrcur_sendFileQuery($cur,"/usr/local/myprogram/sql","myquery.sql");
echo "endsession";
sqlrcon_endSession($con);

sqlrcur_sendQuery($cur,"select * from test");
sqlrcon_endSession($con);

sqlrcur_free($cur);
sqlrcon_free($con);
?>

사이트에 나온 소스코드에서는 아래와 같이 나와있는데 " 를 넣어주지 않으면 에러가 납니다. ; 도 빠져있구요.
dl(sql_relay.so)

** 기타참고사이트
http://sqlb.sourceforge.net/frameset.html
The SQLB project is used to improve SQL requests to a database. It supports MySQL, PostgreSQL and Oracle(tm).

It is a set of deamon programs that make multiple permanent connection to one or more database when they start. Then an external program, previously linked with the sqlb client library, can send SQL requests to these deamons and get the result without any need to make a connection/disconnection. The SQLB PHP and Perl modules provided here with SQLB are some examples of such programs.

** phpschool 참고자료
http://www.phpschool.com/bbs2/inc_view.html?id=6888&code=tnt2 : Too many connections 에러와 DB pool 사용
http://www.phpschool.com/bbs2/inc_view.html?id=8132&code=tnt2 : 새로운 요청 처리 방법
http://www.phpschool.com/bbs2/inc_view.html?id=10093&code=tnt2 : 데이터베이스 풀링에 대한 sqlrelay 설치 문서

반응형

'Program > PHP' 카테고리의 다른 글

cannot create mssql.so on ubuntu 16.04 and php5.6  (0) 2017.02.17
PHP7 에서 PHP5.6 사용하기  (0) 2016.11.11
PHP PHP EXCEL (PHP 엑셀 읽기 쓰기)  (0) 2016.01.21
ubuntu php에서 redis사용하기 - Predis  (0) 2015.05.28
php 기본 내용  (0) 2015.05.27
반응형

ImportError: libSM.so.6: cannot open shared object file: No such file or directory


apt-get install -y python-qt4


반응형

'Program > Python' 카테고리의 다른 글

Python SQL Injection 피하기  (0) 2016.09.28
mysqldb  (0) 2016.09.28
MIT 6.00 컴퓨터 공학과 프로그래밍(Python) 오픈 코스  (0) 2016.05.15
python mysql mssql  (0) 2016.05.13
파이썬 라이브러리를 활용한 데이터 분석  (0) 2016.05.09
반응형


MIT 공대에서 컴퓨터 공학과 프로그래밍 소개에 관한 강의가 유튜브에 올라왔다. 최근에 업로드된 강의가 있음에도 이 강의들을 정리한 이유는 아무래도 한글 자막이 잘 되어 있기 때문이다.

출처 : MIT OpenCourseWare YouTube

교수 : Eric Grimson, John Guttag

제 01강 - 연산이란 - 데이터 타입, 연산자 및 변수 소개

제 02강 - 연산자와 피연산자 - 분기문, 조건문 그리고 반복문

제 03강 - 공통 코드 패턴, 반복 프로그램

제 04강 - 기능을 통한 분해 및 추상화, 재귀 소개

제 05강 - 부동 소수점, 계통적 명세화, 루트 찾기

제 06강 - 이분법, 뉴턴/랩슨, 그리고 리스트 소개

제 07강 - 리스트와 가변성, 딕셔너리, 의사코드, 그리고 효율성 소개

제 08강 - 복잡성 - 로그, 선형, 이차 방정식, 지수 연산 알고리즘

제 09강 - 이진 탐색, 버블 그리고 분류 선택

제 10강 - 분할 정복 방법, 합병 정렬, 예외

제 11강 - 테스트와 디버깅

제 12강 - 디버깅 추가 강의, 배낭 문제, 동적 프로그래밍 소개

제 13강 - 동적 프로그래밍 - Overlapping subproblems, Optimal substructure

제 14강 - 배낭 문제 분석, 객체 지향 프로그래밍 소개

제 15강 - 추상 데이터 타입, 클래스와 메소드

제 16강 - 캡슐화, 상속, 쉐도잉

제 17강 - 연산 모델 - 랜덤워크 시뮬레이션

제 18강 - 시물레이션 결과 제시, Pylab, Plotting

제 19강 - 편향된 랜덤워크, 배포

제 20강 - 몬테카를로(Monte Carlo) 시뮬레이션, 추정 파이

제 21강 - 시뮬레이션 결과 검증, 곡선 적합, 선형 회귀

제 22강 - 일반, 균등 그리고 지수 분포 - 통계의 오류

제 23강 - 주식 시장 시뮬레이션

제 24강 - 과정 개요 - 컴퓨터 과학자들은 무엇을 하나요?


반응형

'Program > Python' 카테고리의 다른 글

mysqldb  (0) 2016.09.28
libSM.so.6  (0) 2016.05.22
python mysql mssql  (0) 2016.05.13
파이썬 라이브러리를 활용한 데이터 분석  (0) 2016.05.09
ipython ubuntu Anaconda  (0) 2016.05.03
반응형


apt-get install python-pip


pip

pip --upgrade

apt-get update

apt-get install python-pip

pip show MySQL-python

pip install MySQL-python

pip install --upgrade

pip install --upgrade pip

pip install MySQL-python

apt-get install libmysqlclient-dev python-dev

pip install MySQL-python


apt-get purge python-pymssql

apt-get install freetds-dev

pip install pymssql


반응형

'Program > Python' 카테고리의 다른 글

libSM.so.6  (0) 2016.05.22
MIT 6.00 컴퓨터 공학과 프로그래밍(Python) 오픈 코스  (0) 2016.05.15
파이썬 라이브러리를 활용한 데이터 분석  (0) 2016.05.09
ipython ubuntu Anaconda  (0) 2016.05.03
[python] MySQL 연결  (0) 2014.11.05
반응형

CHAPTER 1 시작하기 전에
1.1 이 책은?
1.2 왜 데이터 분석을 위한 파이썬인가?
1.2.1 접착제처럼 사용하는 파이썬
1.2.2 한 가지 언어만 사용
1.2.3 파이썬을 사용하면 안 되는 경우
1.3 필수 파이썬 라이브러리
1.3.1 NumPy
1.3.2 pandas
1.3.3 matplotlib
1.3.4 IPython
1.3.5 SciPy
1.4 설치와 설정
1.4.1 윈도우
1.4.2 애플 OS X
1.4.3 리눅스
1.4.4 파이썬 2.x와 파이썬 3.x
1.4.5 통합 개발 환경
1.5 커뮤니티와 컨퍼런스
1.6 이 책을 살펴보는 방법
1.6.1 예제 코드
1.6.2 예제에 사용된 데이터
1.6.3 import 컨벤션
1.6.4 용어
1.7 감사의 말

CHAPTER 2 사례 소개
2.1 bit.ly의 1.usa.gov 데이터
2.1.1 순수 파이썬으로 표준시간대 세어보기
2.1.2 pandas로 표준시간대 세어보기
2.2 MovieLens의 영화 평점 데이터
2.2.1 평점 차이 구하기
2.3 신생아 이름
2.3.1 이름 유행 분석
2.4 맺음말

CHAPTER 3 IPython 소개
3.1 IPython 기본
3.1.1 탭 자동 완성
3.1.2 자기관찰
3.1.3 %run 명령어
3.1.4 클립보드에 있는 코드 실행하기
3.1.5 키보드 단축키
3.1.6 예외와 트레이스백
3.1.7 매직 명령어
3.1.8 Qt 기반의 GUI 콘솔
3.1.9 Pylab 모드와 Matplolib 통합
3.2 명령어 히스토리 사용하기
3.2.1 명령어 검색과 재사용
3.2.2 입middot;출력 변수
3.2.3 입middot;출력 기록하기
3.3 운영체제와 함께 사용하기
3.3.1 셸 명령어와 별칭
3.3.2 디렉터리 북마크 시스템
3.4 소프트웨어 개발 도구
3.4.1 인터랙티브 디버거
3.4.2 코드 시간 측정: %time과 %timeit
3.4.3 기본적인 프로파일링: %prun과 %run -p
3.4.4 함수의 각 줄마다 프로파일링하기
3.5 IPython HTML 노트북
3.6 IPython을 사용한 제품 개발을 위한 팁
3.6.1 모듈 의존성 리로딩하기
3.6.2 코드 설계 팁
3.7 IPython 고급 기능
3.7.1 IPython 친화적인 클래스 만들기
3.7.2 프로파일과 설정
3.8 감사의 글

CHAPTER 4 NumPy 기본: 배열과 벡터 계산
4.1 NumPy ndarray: 다차원 배열 객체
4.1.1 ndarray 생성
4.1.2 ndarray의 자료형
4.1.3 배열과 스칼라 간의 연산
4.1.4 색인과 슬라이싱 기초
4.1.5 불리언 색인
4.1.6 팬시 색인
4.1.7 배열 전치와 축 바꾸기
4.2 유니버설 함수
4.3 배열을 사용한 데이터 처리
4.3.1 배열연산으로 조건절 표현하기
4.3.2 수학 메서드와 통계 메서드
4.3.3 불리언 배열을 위한 메서드
4.3.4 정렬
4.3.5 집합 함수
4.4 배열의 파일 입middot;출력
4.4.1 배열을 바이너리 형식으로 디스크에 저장하기
4.4.2 텍스트 파일 불러오기와 저장하기
4.5 선형대수
4.6 난수 생성
4.7 계단 오르내리기 예제
4.7.1 한 번에 계단 오르내리기 시뮬레이션하기

CHAPTER 5 pandas 시작하기
5.1 pandas 자료 구조 소개
5.1.1 Series
5.1.2 DataFrame
5.1.3 색인 객체
5.2 핵심 기능
5.2.1 재색인
5.2.2 하나의 로우 또는 칼럼 삭제하기
5.2.3 색인하기, 선택하기, 거르기
5.2.4 산술연산과 데이터 정렬
5.2.5 함수 적용과 매핑
5.2.6 정렬과 순위
5.2.7 중복 색인
5.3 기술통계 계산과 요약
5.3.1 상관관계와 공분산
5.3.2 유일 값, 값 세기, 멤버십
5.4 누락된 데이터 처리하기
5.4.1 누락된 데이터 골라내기
5.4.2 누락된 값 채우기
5.5 계층적 색인
5.5.1 계층 순서 바꾸고 정렬하기
5.5.2 단계별 요약통계
5.5.3 DataFrame의 칼럼 사용하기
5.6 pandas와 관련된 기타 주제
5.6.1 정수 색인
5.6.2 Panel 데이터

CHAPTER 6 데이터 로딩, 저장, 파일 형식
6.1 텍스트 파일 이용하는 방법
6.1.1 텍스트 파일 조금씩 읽어오기
6.1.2 데이터를 텍스트 형식으로 기록하기
6.1.3 수동으로 구분 형식 처리하기
6.1.4 JSON 데이터
6.1.5 XML과 HTML: 웹 내용 긁어오기
6.2 이진 데이터 형식
6.2.1 HDF5 형식 사용하기
6.2.2 마이크로소프트 엑셀 파일에서 데이터 읽어오기
6.3 HTML, 웹 API와 함께 사용하기
6.4 데이터베이스와 함께 사용하기
6.4.1 MongoDB에 데이터 저장하고 불러오기

CHAPTER 7 데이터 준비하기: 다듬기, 변형, 병합
7.1 데이터 합치기
7.1.1 데이터베이스 스타일로 DataFrame 합치기
7.1.2 색인 머지하기
7.1.3 축 따라 이어붙이기
7.1.4 겹치는 데이터 합치기
7.2 재형성과 피벗
7.2.1 계층적 색인으로 재형성하기
7.2.2 피버팅으로 데이터 나열 방식 바꾸기
7.3 데이터 변형
7.3.1 중복 제거하기
7.3.2 함수나 매핑 이용해 데이터 변형하기
7.3.3 값 치환하기
7.3.4 축 색인 이름 바꾸기
7.3.5 개별화와 양자화
7.3.6 특이값 찾아내고 제외하기
7.3.7 치환과 임의 샘플링
7.3.8 표시자/더미 변수
7.4 문자열 다루기
7.4.1 문자열 객체 메서드
7.4.2 정규표현식
7.4.3 pandas의 벡터화된 문자열 함수
7.5 예제: 미국 농무부 음식 데이터베이스

CHAPTER 8 도식화와 시각화
8.1 matplotlib API 간략하게 살펴보기
8.1.1 Figure와 서브플롯
8.1.2 색상, 마커, 선 스타일
8.1.3 눈금, 라벨, 범례
8.1.4 주석과 그림 추가
8.1.5 그래프를 파일로 저장
8.1.6 matplotlib 설정
8.2 pandas에서 그래프 그리기
8.2.1 선 그래프
8.2.2 막대 그래프
8.2.3 히스토그램과 밀도 그래프
8.2.4 산포도
8.3 지도 그리기: 아이티 지진 데이터 시각화하기
8.4 파이썬 시각화 도구 생태계
8.4.1 Chaco
8.4.2 mayavi
8.4.3 기타 패키지
8.4.4 시각화 도구의 미래

CHAPTER 9 데이터 수집과 그룹 연산
9.1 GroupBy 메카닉
9.1.1 그룹 간 순회하기
9.1.2 칼럼 또는 칼럼의 일부만 선택하기
9.1.3 사전과 Series에서 묶기
9.1.4 함수로 묶기
9.1.5 색인 단계로 묶기
9.2 데이터 수집
9.2.1 칼럼에 여러 가지 함수 적용하기
9.2.2 색인되지 않은 형태로 집계된 데이터 반환하기
9.3 그룹별 연산과 변형
9.3.1 apply: 분리-적용-병합
9.3.2 변위치 분석과 버킷 분석
9.3.3 예제: 그룹에 국한된 값으로 누락된 값 채우기
9.3.4 예제: 랜덤 표본과 순열
9.3.5 예제: 그룹 가중 평균과 상관관계
9.3.6 예제: 그룹 상의 선형 회귀
9.4 피벗 테이블과 교차일람표
9.4.1 교차일람표
9.5 예제: 2012년 연방 선거관리위원회 데이터베이스
9.5.1 직장 및 피고용별 기부 통계
9.5.2 기부금액
9.5.3 주별 기부 통계

CHAPTER 10 시계열
10.1 날짜, 시간 자료형, 도구
10.1.1 문자열을 datetime으로 변환하기
10.2 시계열 기초
10.2.1 인덱싱, 선택, 부분 선택
10.2.2 중복된 색인을 갖는 시계열
10.3 날짜 범위, 빈도, 이동
10.3.1 날짜 범위 생성하기
10.3.2 빈도와 날짜 오프셋
10.3.3 데이터 시프트
10.4 시간대 다루기
10.4.1 지역화와 변환
10.4.2 시간대 고려해 Timestamp 객체 다루기
10.4.3 다른 시간대 간의 연산
10.5 기간과 기간 연산
10.5.1 Period의 빈도 변환
10.5.2 분기 빈도
10.5.3 타임스탬프와 기간 서로 변환하기
10.5.4 배열을 이용해 PeriodIndex 생성하기
10.6 리샘플링과 빈도 변환
10.6.1 다운샘플링
10.6.2 업샘플링과 보간
10.6.3 기간 리샘플링
10.7 시계열 그래프
10.8 이동창 기능
10.8.1 지수 가중 함수
10.8.2 이진 이동창 함수
10.8.3 사용자 정의 이동창 함수
10.9 성능과 메모리 사용량에 대한 노트

CHAPTER 11 금융, 경제 데이터 애플리케이션
11.1 데이터 준비
11.1.1 시계열과 크로스 섹션 정렬
11.1.2 다른 빈도를 가지는 시계열 연산
11.1.3 일별 시간과 현재 최신 데이터 선택하기
11.1.4 데이터와 함께 나누기
11.1.5 수익 지수와 누적 수익
11.2 그룹 변환과 분석
11.2.1 그룹 요인 밝히기
11.2.2 십분위와 사분위 분석
11.3 추가 예제 애플리케이션
11.3.1 신호 경계 분석
11.3.2 선물 계약 롤링
11.3.3 롤링 상관관계와 선형 회귀

CHAPTER 12 고급 NumPy
12.1 ndarray 객체 내부 알아보기
12.1.1 NumPy dtype 구조
12.2 고급 배열 조작 기법
12.2.1 배열 재형성하기
12.2.2 C와 포트란 순서
12.2.3 배열 이어붙이고 나누기
12.2.4 원소 반복시키기: repeat과 tile
12.2.5 팬시 색인: take와 put
12.3 브로드캐스팅
12.3.1 다른 축에 대해 브로드캐스팅하기
12.3.2 브로드캐스팅 이용해 배열에 값 대입하기
12.4 고급 ufunc 사용법
12.4.1 ufunc 인스턴스 메서드
12.4.2 사용자 ufunc
12.5 구조화된 배열과 레코드 배열
12.5.1 중첩된 dtype과 다차원 필드
12.5.2 구조화된 배열을 사용해야 하는 이유
12.5.3 구조화된 배열 다루기: numpy.lib.recfunctions
12.6 정렬에 관하여
12.6.1 간접 정렬: argsort와 lexsort
12.6.2 다른 정렬 알고리즘
12.6.3 numpy.searchsorted: 정렬된 배열에서 원소 찾기
12.7 NumPy matrix 클래스
12.8 고급 배열 입middot;출력
12.8.1 메모리 맵 파일
12.8.2 HDF5 및 기타 배열 저장 옵션
12.9 성능 팁
12.9.1 인접 메모리의 중요성
12.9.2 기타 성능 옵션: Cython, f2py, C

부록 파이썬 언어의 기본
A.1 파이썬 인터프리터
A.2 파이썬 기초
A.2.1 시멘틱
A.2.2 스칼라형
A.2.3 흐름 제어
A.3 자료 구조와 순차 자료형
A.3.1 튜플
A.3.2 리스트
A.3.3 내장 순차 자료형 함수
A.3.4 사전
A.3.5 세트
A.3.6 리스트 내포, 사전 내포, 세트 내포
A.4 함수
A.4.1 네임스페이스, 스코프, 지역 함수
A.4.2 여러 값 반환하기
A.4.3 함수도 객체다
A.4.4 익명 함수
A.4.5 클로저: 함수를 반환하는 함수
A.4.6 *args와 **kwargs를 사용해서 호출 문법 확장하기
A.4.7 커링: 일부 인자만 취하기
A.4.8 제너레이터
A.5 파일과 운영체제

반응형

'Program > Python' 카테고리의 다른 글

MIT 6.00 컴퓨터 공학과 프로그래밍(Python) 오픈 코스  (0) 2016.05.15
python mysql mssql  (0) 2016.05.13
ipython ubuntu Anaconda  (0) 2016.05.03
[python] MySQL 연결  (0) 2014.11.05
python - mysql MySQLdb  (0) 2014.11.05
반응형

Updates:
7th January, 2016 - changes made according to new Anaconda distribution (v2.4.1) which contains Jupyter Notebook.
Note: The update to the video tutorial is still in progress so please don't refer it for now. Once, I have updated it, I'll remove this note from here.


I hope everyone is familiar with the AWS (Amazon Web Services) and how to use iPython (Now Jupyter) Notebooks. If you are not familiar with Jupyter Notebook and you work with Python, then you are definitely missing a very important tool in you work. Please go through this video which is a short tutorial on iPython (Jupyter) Notebook.

OK, to begin with, I'll list all the steps to create an Jupyter Notebook Server on an EC2 Instance in a step-wise fashion. I have also created a Youtube Video for this post, which you can check it out here.(update in progress to the video. please don't refer it for now)

The reason for deploying Jupyter Notebook Server on AWS is to access all my Notebooks from anywhere in the World, just using my browser and also be able to work with them.

Enough of talking, let's begin:

1. Login to your Amazon Management Console. If you don't have an account yet, you can create one for it. You get 1 yr of free access to some of the services, which you can check out at this link

2. Create a new EC2 Instance with Ubuntu. If you are not familiar with how to create an EC2 instance, you can check out the video of this blog, in which I go through the steps from the beginning.

3. The important thing to remember while creating the instance is to assign the security group settings as mentioned in the image below


4. Launch your instance and ssh into it to perform the following operations
  • First of all we are going to use Anaconda Python Distribution for installing all the required Python libraries. This is a free distribution and we are going to use the Linux version of it. Remember to verify the latest version of the distribution from the site. This blog is updated to reflect the changes in the latest Anaconda distribution - 2.4.1.
    $ wget https://3230d63b5fc54e62148e-c95ac804525aac4b6dba79b00b39d1d3.ssl.cf1.rackcdn.com/Anaconda2-2.4.1-Linux-x86_64.sh
       
  • Next we will bash to run this .sh file. You need to accept the license terms and set the installation directory for the anaconda distribution. I use the default one only, which is "/home/ubuntu/anaconda2/". Also, it asks you to add the default path of anaconda python to your .bashrc profile. You can accept to do it or add it manually.
    $ bash Anaconda2-2.4.1-Linux-x86_64.sh
       
  • Now you need to check, which python version you are using, just to confirm if we are using the one from Anaconda Distribution or not. You can do this by using
    $ which python
       
    This will list the python your system is currently using. If it does not mentions the one from ".../anaconda2/..." folder, then you can use the following command to re-load your.bashrc, so as to set the correct python
    $ source .bashrc
       
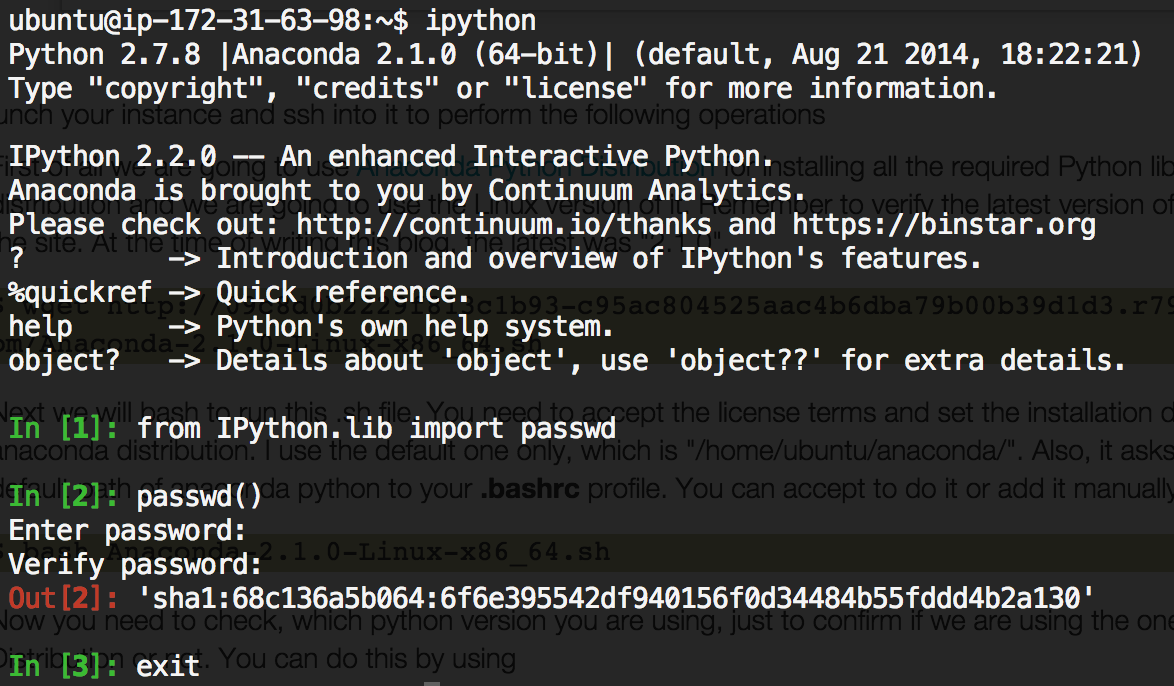
  • Open the iPython Terminal to get an encrypted password so as to use it for logging into our iPython Notebook Server. Remember to copy and save the output of this command, which will be an encrypted password, something like "sha1..."
    $ ipython
    In [1]:from IPython.lib import passwd
    In [2]:passwd()
    and exit out of ipython terminal using "exit" command. [ I'm not gonna use this password(shown in the pic below), so don't waste your time trying to copy and use it. ;) ]
  • Now we're going to create the configuration profile for our Jupyter Notebook server
    $ jupyter notebook --generate-config
       
  • The next thing is going to be to create a self-signed certificate for accessing our Notebooks through HTTPS
    $ mkdir certs
    $ cd certs
    $ sudo openssl req -x509 -nodes -days 365 -newkey rsa:1024 -keyout mycert.pem -out mycert.pem
       
    it will ask some questions, please answer them to the best of your knowledge as some of them are required to successfully create the certificate.

  • It's time to change the config settings of our server
    $ cd ~/.jupyter/
    $ vi jupyter_notebook_config.py
       
    You will see a long list of configuration settings. You can go through each one of them and uncomment them as you like, but for me I know what I want, so I'll add the following settings to the top of the file and leave the rest commented as it is.
    c = get_config()
    
    # Kernel config
    c.IPKernelApp.pylab = 'inline'  # if you want plotting support always in your notebook
    
    # Notebook config
    c.NotebookApp.certfile = u'/home/ubuntu/certs/mycert.pem' #location of your certificate file
    c.NotebookApp.ip = '*'
    c.NotebookApp.open_browser = False  #so that the ipython notebook does not opens up a browser by default
    c.NotebookApp.password = u'sha1:68c136a5b064...'  #the encrypted password we generated above
    # It is a good idea to put it on a known, fixed port
    c.NotebookApp.port = 8888
       
  • We are almost done. Now its time to start our Jupyter notebook server. For this, first I'll create a new folder which will store all my notebooks
    $ cd ~
    $ mkdir Notebooks
    $ cd Notebooks
       
    and now I'll start my notebook server
    $ jupyter notebook
       
5. And that is all. Now you can access your Notebook from anywhere through your browser. Just navigate to the DNS name, or Public IP of your instance, along with the port number. (By default, the browser adds "http" to the url. Please remember to update it to "https")
You will be asked by your browser to trust the certificate, as we have signed it on our own, so we know we can trust it. See images for reference below:


6. Login, using the password you specified when you used the iPython Terminal to create an encrypted version of it and you are good to go.


7. One thing to note is that if you close the ssh access to your instance, your notebook server will not work. To keep it working, even when you close the ssh access to the server you can use the following command
$ nohup jupyter notebook
  

This will put your server process as no-hangup and will keep it running even if you close the ssh access to the instance 

8. Later, if you decide you want to stop this process, you have to find the PID of this process. you can do so by going into your notebooks folder and using the command
$ lsof nohup.out
  

which will list the PID of the nohup process which is running(if any). 
Then you can use the kill command to kill this process and stop your ipython notebook server. 

$ kill -9 "PID"
  

replace "PID" with the ID of the process you get from the "lsof" command. 

So, that is all you need to run an iPython Notebook on AWS EC2 instance. Please leave your comments about this blog post and do remember to check out its video.(update in progress to the video. please don't refer it for now)

Until next time... :)

반응형
반응형

http://blog.naver.com/ateon1/120202184897


출처 : http://blog.naver.com/blackfrost/40134487471

http://phpexcel.codeplex.com/

https://code.google.com/p/php-excel-reader/


2번째 방법은 아래의 링크이다. 


http://phpexcel.codeplex.com/


들어가서 해당CLASS를 다운 받고 쓰면 될것이다. 상당히 방대한 용량의 클래스인만큼, 거기에 나와 있는 40가지의 예제들처럼 엄청난 활용이 가능하다. 다만 PHP 5.2이상 버전인 환경에서만 사용되니 알아두기 바란다.


3번재 방법은 정말 간단하면서 깔끔하다.


http://code.google.com/p/php-excel-reader/


들어가보면 보이는 그림만으로 뭔지 눈치 챌것이다 위 CLASS처럼 여러가지상황에 맞춰 여러가지를 해줄수 있는것도 좋지만, 이건 정말 딱 엑셀을 업로드하면 엑셀을 정확히 읽어서 웹에 표시해준다. 간단하면서도 보통 필요한게 이런것이 아닐까 싶다.


필자는 1번째를 먼저 접하는 바람에 1번째 방법으로 삽질좀 했지만, 다른 분들은 상황에 맞게 2,3번째 방법으로 깔끔한 처리를 하기 바라는 의미에서 이 포스팅을 써본다.


http://spac.tistory.com/176


기존 엑셀 2003까지 버전은 확장자가 xls 로 생성되며 한시트에 최대 65,535 라인까지 처리할 수 있다.

그 이상의 행을 처리하려면 엑셀 2007 이상의 버전에서 xlsx 파일로 생성해야 한다. (100만 라인까지 가능)


기본 65,535라인을 넘는 데이터를 처리해야 할 경우 PHPExcel 클래스를 이용해 간단히 처리할 수 있다.

참고로 서버에 zip 라이브러리가 설치되어 있어야 한다.


먼저 PHPExcel 클래스를 다운로드 받자

http://www.codeplex.com/PHPExcel 에 방문하여 최신 버전을 내려받는다.


현재 기준으로 1.7.9 버전이 최신이다.

파일을 내려 받으면 PHPExcel_1.7.9_doc.zip 라는 파일이 받아진다.

압축을 풀어 서버에 업로드 한다. 


나의 경우에는 서버 계정의 _lib 디렉토리에 업로드 하고 디렉토리명을 PHPExcel 로 설정했다.


POST로 엑셀파일을 업로드 하는 폼 페이지는 생략 하겠다.

아래는 폼 페이지에서 파일을 업로드 하면 실행하는 파일이다.

(POST 로 날라오는 파일 폼 이름이  "upfile" 이라 정하면)


<?php

include $_SERVER["DOCUMENT_ROOT"]."/_lib/PHPExcel/Classes/PHPExcel.php"; 

$UpFile = $_FILES["upfile"];

$UpFileName = $UpFile["name"];


$UpFilePathInfo = pathinfo($UpFileName);
$UpFileExt = strtolower($UpFilePathInfo["extension"]);

if($UpFileExt != "xls" && $UpFileExt != "xlsx") {
echo "엑셀파일만 업로드 가능합니다. (xls, xlsx 확장자의 파일포멧)";
exit;
}

//-- 읽을 범위 필터 설정 (아래는 A열만 읽어오도록 설정함  => 속도를 중가시키기 위해)
class MyReadFilter implements PHPExcel_Reader_IReadFilter
{
public function readCell($column, $row, $worksheetName = '') {
// Read rows 1 to 7 and columns A to E only
if (in_array($column,range('A','A'))) {
return true;
}
return false;
}
}
$filterSubset = new MyReadFilter();

//업로드된 엑셀파일을 서버의 지정된 곳에 옮기기 위해 경로 적절히 설정
$upload_path = $_SERVER["DOCUMENT_ROOT"]."/Uploads/Excel_".date("Ymd");
$upfile_path = $upload_path."/".date("Ymd_His")."_".$UpFileName;
if(is_uploaded_file($UpFile["tmp_name"])) {

if(!move_uploaded_file($UpFile["tmp_name"],$upfile_path)) {
echo "업로드된 파일을 옮기는 중 에러가 발생했습니다.";
exit;
}

//파일 타입 설정 (확자자에 따른 구분)
$inputFileType = 'Excel2007';
if($UpFileExt == "xls") {
$inputFileType = 'Excel5';
}

//엑셀리더 초기화
$objReader = PHPExcel_IOFactory::createReader($inputFileType);

//데이터만 읽기(서식을 모두 무시해서 속도 증가 시킴)
$objReader->setReadDataOnly(true);

//범위 지정(위에 작성한 범위필터 적용)
$objReader->setReadFilter($filterSubset);

//업로드된 엑셀 파일 읽기
$objPHPExcel = $objReader->load($upfile_path);

//첫번째 시트로 고정
$objPHPExcel->setActiveSheetIndex(0);

//고정된 시트 로드
$objWorksheet = $objPHPExcel->getActiveSheet();

  //시트의 지정된 범위 데이터를 모두 읽어 배열로 저장
$sheetData = $objPHPExcel->getActiveSheet()->toArray(null,true,true,true);
$total_rows = count($sheetData);

foreach($sheetData as $rows) {

$fieldData = $rows["A"]; //A열값을 가져온다.
    /* 데이터 처리 */

}

}
.
.
?>


너무 큰 파일을 읽을 경우 메모리 제한을 풀어줘야 한다.

http://jmnote.com/wiki/PHP_%EB%A9%94%EB%AA%A8%EB%A6%AC_%EB%B6%80%EC%A1%B1

ini_set('memory_limit','-1');


http://forum.falinux.com/zbxe/index.php?document_srl=578422&mid=lecture_tip


PHPExcel를 사용해서 내용을 간단하게 입력해보고 다운로드 받을 수 있도록 테스트해볼 예정입니다.


1. 환경 설정


리눅스에서 Apache, PHP 가 설치되어 있어야합니다.

Ubuntu 에서는 apt-get 으로 apache2 와 php5 를 설치하면 됩니다.


윈도우에서는 apmsetup 을 설치하시면 간단합니다.

APMSETUP 홈페이지 주소는 아래와 같습니다.


홈페이지 주소 : http://www.apmsetup.com


리눅스 apache2 의 경우, 기본 홈 디렉토리가 /var/www/ 이며

윈도우에서 apmsetup 을 설치했을 경우, 기본 홈 디렉토리가 C:\APM_Setup\htdocs 입니다.


강좌는 윈도우에서 php_sample.php 라는 파일을 만들고 진행하였습니다.


2. 샘플 파일


PHPExcel 사이트에 받은 PHPExcel_1.7.8-with_documentation-msoffice_format.zip 파일의 압축을 풀고 html 기본 홈 디렉토리에 넣어줍니다.


윈도우에서 진행했으니, C:\APM_Setup\htdocs 안에 PHPExcel 폴더를 복사해줍니다.


아래는 미리 만들어진 기본 소스 입니다.


<?php
    require_once 'PHPExcel/Classes/PHPExcel.php';
    $objPHPExcel = new PHPExcel();
 
    header('Content-Type: application/vnd.ms-excel');
    header('Content-Disposition: attachment;filename=sample.xls');
    header('Cache-Control: max-age=0');
 
    $objWriter = PHPExcel_IOFactory::createWriter($objPHPExcel, 'Excel5');
    $objWriter->save('php://output');
 
    exit;
?>


require_once : PHPExcel 관련 PHP 파일을 포함시켜줘야합니다. PHPExcel 안에 Classes/PHPExcel.php 파일의 경로를 적어줍니다.


그 다음 header 에는 PHPExcel의 샘플 내용대로 엑셀 파일을 다운로드 받을 수 있도록 파일명을 정해줍니다.


위의 내용대로 만든 다음, 웹 브라우저에서 주소를 입력해서 테스트를 해보도록 합니다.


주소를 입력하면 아래 그림과 같이 sample.xls 파일을 다운로드 됩니다.


3. 기본 설정 추가


엑셀 파일이 다운로드 되는 것을 확인했으니, 이제 엑셀 파일의 내용을 넣어줄 차례입니다.


PHPExcel을 새로 만들어준다음,


$objPHPExcel = new PHPExcel();


사용이 가능하도록 시트를 설정해줍니다.


$sheet      = $objPHPExcel->getActiveSheet();


엑셀의 기본 글꼴을 정해주지 않으면, 영문쪽 글꼴로 선택됩니다. 윈도우 기본 폰트인 '맑은 고딕' 으로 설정해주기 위해서 아래와 같이 설정해 줍니다.


$sheet->getDefaultStyle()->getFont()->setName('맑은 고딕');


폰트 크기를 정하고 싶다면 뒤에 ->setSize를 넣어주면 됩니다.


$sheet->getDefaultStyle()->getFont()->setName('맑은 고딕')->setSize(10);


4. 내용 추가


간단하게 아래와 같이 내용을 추가해주기 위해서 PHP 소스를 추가하도록 하겠습니다.


처음에는 사용하게 될 시트를 선택해줘야 합니다.

아래 명령처럼 제일 첫 번째 시트를 선택하도록 합니다.


$sheetIndex = $objPHPExcel->setActiveSheetIndex(0);


$sheetIndex 에 내용을 추가하면 됩니다.

위의 '제목' 처럼 입력하면 아래와 같이 적어줍니다.


A1 셀에 내용을 '제 목' 이라고 입력해줍니다.


$sheetIndex->setCellValue('A1','제 목');


A1 ~ D1 셀 내용을 합쳐줍니다.


$sheetIndex->mergeCells('A1:D1');


A1 셀의 폰트와 스타일을 정해줍니다. 폰트 크기는 20으로 하고 두껍게 표시하도록 하였습니다.


$sheetIndex->getStyle('A1')->getFont()->setSize(20)->setBold(true);


A1 셀 내용이 중앙 정렬되도록 아래와 같이 입력해줍니다.


$sheetIndex->getStyle('A1')->getAlignment()->setHorizontal(PHPExcel_Style_Alignment::HORIZONTAL_CENTER);


위의 내용을 추가하고 웹 브라우저에서 주소를 입력하면 '제 목'을 볼 수 있습니다.


그 다음 내용을 추가해줄 차례입니다.

아래와 같이 셀주소와 내용을 입력해주면 됩니다.


$sheetIndex ->setCellValue('A2', '하나')
                ->setCellValue('B2', '둘')
                ->setCellValue('C2', '셋')
                ->setCellValue('D2', '넷');


위와 같이 작성한 후에 웹 브라우저에서 입력을 하면 아래 그림과 같은 화면을 볼 수 있습니다.


간단한 내용을 출력하는거지만, 생각외로 정해줄게 많은거 같습니다.


5. 전체 소스


<?php
    require_once 'PHPExcel/Classes/PHPExcel.php';
    $objPHPExcel = new PHPExcel();

    $sheet      = $objPHPExcel->getActiveSheet();

    // 글꼴
    $sheet->getDefaultStyle()->getFont()->setName('맑은 고딕');

    $sheetIndex = $objPHPExcel->setActiveSheetIndex(0);

    // 제목
    $sheetIndex->setCellValue('A1','제 목');
    $sheetIndex->mergeCells('A1:D1');
    $sheetIndex->getStyle('A1')->getFont()->setSize(20)->setBold(true);
    $sheetIndex->getStyle('A1')->getAlignment()->setHorizontal(PHPExcel_Style_Alignment::HORIZONTAL_CENTER);

    // 내용
    $sheetIndex ->setCellValue('A2', '하나')
                ->setCellValue('B2', '둘')
                ->setCellValue('C2', '셋')
                ->setCellValue('D2', '넷');

    header('Content-Type: application/vnd.ms-excel');
    header('Content-Disposition: attachment;filename=sample.xls');
    header('Cache-Control: max-age=0');
 
    $objWriter = PHPExcel_IOFactory::createWriter($objPHPExcel, 'Excel5');
    $objWriter->save('php://output');
 
    exit;
?>


참고용으로 좋음.

http://gyuha.tistory.com/454


반응형

'Program > PHP' 카테고리의 다른 글

PHP7 에서 PHP5.6 사용하기  (0) 2016.11.11
SQL Relay php connection  (0) 2016.07.17
ubuntu php에서 redis사용하기 - Predis  (0) 2015.05.28
php 기본 내용  (0) 2015.05.27
PHP PDO 예제  (0) 2015.05.08
반응형

using System;

using System.Collections.Generic;

using System.Linq;

using System.Text;

using System.Threading.Tasks;


namespace Dev_Console

{

    class Program

    {


        private static bool CheckPassed(int score)

        {

            if (score >= 60)

                return true;

            else

                return false;

        }


        private static void Print(int value)

        {

            Console.Write("{0} ", value);

        }


        public static void Main(string[] args)

        {

            int[] scores = new int[] { 80, 74, 81, 90, 34 };


            foreach (int score in scores)

            {

                Console.Write("{0} ", score);

            }

            Console.WriteLine();


            Array.Sort(scores);

            Array.ForEach<int>(scores, new Action<int>(Print));

            Console.WriteLine();


            Console.WriteLine("Number of dimensions : {0}", scores.Rank);


            Console.WriteLine("Binary Search : 81 is at {0}", Array.BinarySearch<int>(scores, 81));

            Console.WriteLine("Linear Search : 90 is at {0}", Array.IndexOf(scores, 90));


            Console.WriteLine("Everyone passed ? : {0}", Array.TrueForAll<int>(scores, CheckPassed));


            int index = Array.FindIndex<int>(scores, delegate(int score)

            {

                if (score < 60)

                    return true;

                else

                    return false;

            });


            scores[index] = 61;

            Console.WriteLine("Everyone passed ? : {0}", Array.TrueForAll<int>(scores, CheckPassed));


            Console.WriteLine("Old length of scores : {0}", scores.GetLength(0));


            Array.Resize<int>(ref scores, 10);

            Console.WriteLine("New length of scores : {0}", scores.Length);


            Array.ForEach<int>(scores, new Action<int>(Print));

            Console.WriteLine();


            Array.Clear(scores, 3, 7);


            Array.ForEach<int>(scores, new Action<int>(Print));

            Console.WriteLine();

        }


    }


}

반응형

'Program > C#' 카테고리의 다른 글

c# vb 변환  (0) 2011.10.26
닷넷!! All-In-One Code Framework!!  (0) 2011.03.24
.NET 개발자를 위한 무료 소프트웨어  (0) 2011.03.24
디렉토리 안에 폴더 삭제 하기  (0) 2011.03.24
다중서버관리  (0) 2011.03.24
반응형

Predis 모듈을 사용하면 php에서 redis를 사용할 수 있다.(phpredis 도 있음)


Predis를 설치하기 위해 pear을 설치

(c) sudo apt-get install php-pear

pear.nrk.io를 pear채널에 추가

(c) sudo pear channel-discover pear.nrk.io

nrk/Predis 설치

(c) sudo pear install nrk/Predis

Predis가 설치완료 되었다.
(여기서 삽질을 좀 했는데, 설치가 끝났다고 nrk나 Predis폴더가 만들어지지 않는다.
소스작업을 해보니 된다. =_=
난 시스템 개발자가 아니니 그냥 pass)

이제 소스 작업을 시작해 보자

<?
require_once "Predis/Autoloader.php";
Predis\Autoloader::register();
$redis = new Predis\Client();
$redis->set('foo', 'bar');
$value = $redis->get('foo');
echo $value;
?>

화면에 bar 가 나오면 OK


반응형

'Program > PHP' 카테고리의 다른 글

PHP7 에서 PHP5.6 사용하기  (0) 2016.11.11
SQL Relay php connection  (0) 2016.07.17
PHP PHP EXCEL (PHP 엑셀 읽기 쓰기)  (0) 2016.01.21
php 기본 내용  (0) 2015.05.27
PHP PDO 예제  (0) 2015.05.08
반응형

1. 클래스를 생성할때 클래스에 인수를 넘기는게 있던데 어떻게 받는건지;;

예를들어서 $test = new Class("test");

이런식으로 인수를 넘기면 어떻게 받는지 궁금하구요


 - 객체 생성시 클래스로 넘기는 인수는 PHP5 의 경우 클래스내에 __construct() 라는 생성자 함수로 넘어가게 되며 PHP4 는 클래스 이름과 동일한 이름의 함수가 생성자 역활을 하므로 해당 함수로 넘어가게 됩니다.


예)

class test {

    function __construct($a) {

        echo $a;

    }

}


$t = new test('Hello');


객체 생성과 함께 화면에 Hello 라고 출력됩니다.


2. 클래스 함수등에 엠퍼센트(&)를 붙여서 쓰는게 있던데 이건 어디에 쓰는건지 모르겠어요

예를 들어서 $test->&test("test");

이런건 어디에 쓰고 또 어떻게 쓰는건지 알려주세요


- 우선 질문에 적으신 $test->&test("test") 는 문법 오류를 발생시킵니다. 엠퍼센트가 위치할 곳은 맨 앞쪽입니다.

&$test->test(); 와 같이요. 이 같은 사용법은 약간은 다르지만 C 에서 포인터와 비슷합니다. 즉 어떠한 값이 복사가 되는 것이 아니고 그 값을 가리키는 새로운 이름이 생성되는 것과 같습니다. 아래 예를 보세요.


$a = 1;

$b = $a;


위와 같이 했을 때 $b 가 같은 값인 1을 가지고 있긴 하지만 메모리 상에서는 다른 값으로 처리됩니다. 즉 $b 변수에 값이 대입될 때 $a 에 있는 값과 동일한 값을 메모리상 새로운 공간에 저장을 한다는 것이죠. 하지만...


$a = 1;

$b = &$a;


위와 같이 처리하면 $a 와 $b 는 메모리 위치상 같은 공간의 값을 가리키고 있게 됩니다.

그럼 엠퍼센트가 함수에 붙었을 경우는...


class test {

    private $a = 1;

    public function &aa() {

        echo $this->$a;

    }

}


$t = new test();

$d = &$t->aa();

echo $d; // 1 출력


$d++;


echo $t->aa(); // 2 출력


위 예제의 결과와 같이 $d 변수에 ++ 를 해주니 실제 객체 안에 있는 $a 멤버변수의 값이 변환되고 있습니다. 만약 위 예제에서 & 를 제외한다면 두번째 출력 값은 1 이 될 것 입니다.


그런데 주의하실 점은 위 예제와 같이 메소드를 통해 참조전달을 사용하시려면 메소드명 앞에도 엠퍼센트를 붙여줘야 한다는 것과 class 안에서 private 이나 protected 로 선언된 변수라도 위와 같이 사용을 하면 외부에서 접근이 가능하다는 것에 주의하셔야 합니다.


3. 클래스에서 ::이건 또 어디에 쓰이는지;;

가끔 보면 $test::test();이렇게 되어있던데 이건 어떻게 쓰고 왜 쓰는지 알려주세요


- :: 는 하나의 실행 연산자인데요. class 내에 메소드를 사용하려면 class 명을 이용하여 객체를 생성하고 해당 객체를 이용해서 메소드를 실행하게 됩니다. 하지만 가끔 어떤 class 내에 메쏘드 기능이 잠시 필요할 수도 있겠죠? 이런 상황에서 :: 를 쓰면 가장 좋습니다. 아래 예를 보세요.


class test {

    private $num = 1;

    public function aa() {

        echo "Hello!";

    }

    public function bb() {

        echo $this->num;

    }

}


우선 일반적인 방법으로 aa() 메소드를 실행하려면...


$t = new test();

$t->aa();


이렇게 해야 합니다. 하지만 :: 연산자를 사용하면 아래와 같이 한줄로 끝나죠.


test::aa();


여기서 중요한 것은 위와 같이 실행했을 경우 실제 test 객체는 생성되지 않습니다. 그 말은 $num 이란 멤버 변수 역시 생성되지 않는 다는 것이죠. 그래서 test::bb() 와 같이 bb() 메소드를 실행하면 에러가 출력됩니다. 이 점만 기억하시면 별문제 없이 사용하실 수 있겠네요.


4. static정적 멤버변수는 어디에 쓰이는지 궁금해요.


- 이 변수는 객체가 여러번 생성되도 모든 객체가 공유할 수 있는 값을 저장하는데 사용하시면 됩니다. 딱히 떠오르는 예제는 없지만 싱글턴 이라는 디자인패턴이 있습니다.


이 패턴의 중요 포인트는 어떤 프로그램에서 a라는 클래스를 여러번 이용할 경우 객체가 여러개 생성되게 됩니다. 이때 만약 처음으로 생성되는 객체를 프로그램 끝까지 사용할 수 있도록 하면 메모리 사용량도 줄일 수 있고 편리하겠다 하는 아이디어에서 나온 패턴입니다. 이 패턴을 구성할 때 사용되는 것이 static 변수 입니다.


class test {

    private static $instance = null;


    public static function getInstance() {

        if(self::$instance == null) {

            self::$instance = new self;

        }

        return self::$instance;

    }


    public function go() {

        echo 'Hello!';

    }

}


위 예제는 간단한 싱글턴 구조입니다. 이 클래스를 사용할 때는 이전의 new 키워드가 아닌 :: 연산자를 이용하여 getInstance() 를 바로 실행 함으로써 객체를 생성하게 됩니다.


$t = test::getInstance();


위와 같이 생성을 하게 되면 getInstance() 메소드 내용대로 현재 객체가 생성되어 있는지를 확인하고 생성되어 있지 않을 경우 새로 생성하여 반환하며 생성되어 있다면 해당 객체를 반환합니다. 즉 전체 프로그램에서 100번을 사용해도 실제 생성되는 객체는 1개라는 것이죠.


이와 같이 프로그램이 종료되기 직전까지 꾸준히 필요한 값을 저장하는 용도로 사용하기에는 딱 좋겠죠? 

반응형

'Program > PHP' 카테고리의 다른 글

PHP7 에서 PHP5.6 사용하기  (0) 2016.11.11
SQL Relay php connection  (0) 2016.07.17
PHP PHP EXCEL (PHP 엑셀 읽기 쓰기)  (0) 2016.01.21
ubuntu php에서 redis사용하기 - Predis  (0) 2015.05.28
PHP PDO 예제  (0) 2015.05.08
반응형


Example#1 Connecting to MySQL

<?php
$dbh 
= new PDO('mysql:host=localhost;dbname=test'$user$pass);
?>

Example#2 Handling connection errors
<?php
try {
   
$dbh = new PDO('mysql:host=localhost;dbname=test'$user$pass);
   foreach (
$dbh->query('SELECT * from FOO') as $row) {
      
print_r($row);
   }
   
$dbh null;
} catch (
PDOException $e) {
   print 
"Error!: " $e->getMessage() . "<br/>";
   die();
}
?>

Example#3 Closing a connection
<?php
$dbh 
= new PDO('mysql:host=localhost;dbname=test'$user$pass);
// use the connection here


// and now we're done; close it
$dbh null;
?>

Example#4 Persistent connections

<?php
$dbh 
= new PDO('mysql:host=localhost;dbname=test'$user$pass, array(
  
PDO::ATTR_PERSISTENT => true
));
?>

Example#5 Executing a batch in a transaction
<?php
try {
  
$dbh = new PDO('odbc:SAMPLE''db2inst1''ibmdb2'
      array(
PDO::ATTR_PERSISTENT => true));
  echo 
"Connected\n";
  
$dbh->setAttribute(PDO::ATTR_ERRMODEPDO::ERRMODE_EXCEPTION);

  
$dbh->beginTransaction();
  
$dbh->exec("insert into staff (id, first, last) values (23, 'Joe', 'Bloggs')");
  
$dbh->exec("insert into salarychange (id, amount, changedate) 
      values (23, 50000, NOW())"
);
  
$dbh->commit();
  
} catch (
Exception $e) {
  
$dbh->rollBack();
  echo 
"Failed: " $e->getMessage();
}
?>

Example#6 Repeated inserts using prepared statements
<?php
$stmt 
$dbh->prepare("INSERT INTO REGISTRY (name, value) VALUES (:name, :value)");
$stmt->bindParam(':name'$name);
$stmt->bindParam(':value'$value);

// insert one row
$name 'one';
$value 1;
$stmt->execute();

// insert another row with different values
$name 'two';
$value 2;
$stmt->execute();
?>

Example#7 Repeated inserts using prepared statements
<?php
$stmt 
$dbh->prepare("INSERT INTO REGISTRY (name, value) VALUES (?, ?)");
$stmt->bindParam(1$name);
$stmt->bindParam(2$value);

// insert one row
$name 'one';
$value 1;
$stmt->execute();

// insert another row with different values
$name 'two';
$value 2;
$stmt->execute();
?>

Example#8 Fetching data using prepared statements
<?php
$stmt 
$dbh->prepare("SELECT * FROM REGISTRY where name = ?");
if (
$stmt->execute(array($_GET['name']))) {
  while (
$row $stmt->fetch()) {
    
print_r($row);
  }
}
?>

Example#9 Calling a stored procedure with an output parameter

<?php
$stmt 
$dbh->prepare("CALL sp_returns_string(?)");
$stmt->bindParam(1$return_valuePDO::PARAM_STR4000); 

// call the stored procedure
$stmt->execute();

print 
"procedure returned $return_value\n";
?>

Example#10 Calling a stored procedure with an input/output parameter

<?php
$stmt 
$dbh->prepare("CALL sp_takes_string_returns_string(?)");
$value 'hello';
$stmt->bindParam(1$valuePDO::PARAM_STR|PDO::PARAM_INPUT_OUTPUT4000); 

// call the stored procedure
$stmt->execute();

print 
"procedure returned $value\n";
?>

Example#11 Invalid use of placeholder

<?php
$stmt 
$dbh->prepare("SELECT * FROM REGISTRY where name LIKE '%?%'");
$stmt->execute(array($_GET['name']));

// placeholder must be used in the place of the whole value
$stmt $dbh->prepare("SELECT * FROM REGISTRY where name LIKE ?");
$stmt->execute(array("%$_GET[name]%"));
?>


반응형

'Program > PHP' 카테고리의 다른 글

PHP7 에서 PHP5.6 사용하기  (0) 2016.11.11
SQL Relay php connection  (0) 2016.07.17
PHP PHP EXCEL (PHP 엑셀 읽기 쓰기)  (0) 2016.01.21
ubuntu php에서 redis사용하기 - Predis  (0) 2015.05.28
php 기본 내용  (0) 2015.05.27
반응형

뭐가 이리 많이 바뀌었는지..-_-;

자체 수정해서 보관한다.


var fs = require('fs');

var http = require('http');

var express = require('express');

var bodyParser = require('body-parser');

var multiparty = require('multiparty');

var router = express.Router();


var DummyDB = (function () {

var DummyDB = {};

var storage = [];

var count = 1;

DummyDB.get = function (id) {

if (id) {

id = (typeof id == 'string') ? Number(id) : id;

for (var i in storage) if (storage[i].id == id) {

return storage[i];

}

} else {

return storage;

}

};

DummyDB.insert = function (data) {

data.id = count++;

storage.push(data);

return data;

};

DummyDB.remove = function (id) {

id = (typeof id == 'string') ? Number(id) : id;

for (var i in storage) if (storage[i].id == id) {

storage.splice(i, 1);

return true;

}

return false;

};

return DummyDB;

})();


var app = express();


app.use(bodyParser.json({ }));

//app.use(bodyParser());


app.use(router);


router.get('/user', function (request, response) {

response.send(DummyDB.get());

});

router.get('/user/:id', function (request, response) {

response.send(DummyDB.get(request.param('id')));

});

router.post('/user', function (request, response) {

var form = new multiparty.Form ({

// autoFiles : true,

// uploadDir : '.',

// maxFileSize : 1024 * 1024 * 10

});

form.parse(request, function (error, fields, files) {

var name = fields.name[0];

var region = fields.region[0];

console.log(name, region);

if (name && region) {

response.send(DummyDB.insert({

name: name,

region: region

}));

} else {

throw new Error('error');

}

});


});

router.put('/user/:id', function (request, response) {

var form = new multiparty.Form ({ });

form.parse(request, function (error, fields, files) {

//console.log(request.param('id'));

var id = request.param('id');

var name = fields.name[0];

var region = fields.region[0];

console.log(id, name, region);

var item = DummyDB.get(id);

item.name = name || item.name;

item.region = region || item.region;

response.send(item);

});

});

router.delete('/user/:id', function (request, response) {

response.send(DummyDB.remove(request.param('id')));

});


http.createServer(app).listen(1004, function () {

console.log('Server Running.....');

});


반응형

'Program > nodejs' 카테고리의 다른 글

middle ware 에러 날 때  (0) 2015.04.13
반응형

https://github.com/senchalabs/connect#middleware


http://blog.naver.com/PostList.nhn?blogId=rintiantta&from=postList&categoryNo=232


cookieParser()


bodyParser();

반응형

'Program > nodejs' 카테고리의 다른 글

RESTful 웹서비스 개발 샘플 수정  (0) 2015.04.14
반응형

어제 python 관련 글 올린 김에 많은 분들이 찾으시는 MySQL 데이터베이스 이용과 관련된 내용을 정리해드립니다.

예전에 제가 프로그래밍으로 밥 벌어먹기 시작했을 때(!)에는 여러가지 DBMS가 많았습니다만, 이제는 LAMP니 뭐니 할 정도로 MySQL이 정석이 되었습니다. 실제로 제가 있었던 회사는 MySQL로 회원 수 천만이 넘는 사이트를 무리 없이 운영하니까요. 옛날에는 MySQL로 그 정도 규모의 상업적인 서비스를 한다 그러면 주위에서는 그거로 돌리면 불안해서 밤에 잠이 오겠냐, M$나 오라클 써라 했었는데요. ㅋㅋ

다 오픈소스의 힘이라고 생각합니다. 그만큼 보완이 많이 되고, 서비스를 하면서 경험이 축적되면서 개선이 되니까요. 개인적으로는 MongoDB로 개발을 하고 있는 부분이 있는데 Mongo가 더 재미있긴 하지만요.

각설하고, python에서 MySQL 이용하는 것과 관련해서 간단하게 정리해 보겠습니다.

많이 이용되고 있는 모듈은 

_mysql, MySQLdb

입니다.

_mysql은 C API를 이용하는 raw-level 모듈이고, MySQLdb는 _mysql 모듈을 포장한 wrapper입니다. 

연결은 

con = MySQLdb.connect('localhost', 'testuser', 'mypassword', 'mydbname')


이런 식으로 해주시면 되고, 연결 후에는 cursor를 생성하여 이용하시면 됩니다.

간단하게 예를 들어보면 아래와 같습니다:

1
2
3
4
5
6
7
8
9
10
11
12
13
14
15
16
17
18
#!/usr/bin/python
# -*- coding: utf-8 -*-
import MySQLdb as mdb
import sys
 
try:
    con = mdb.connect('localhost', 'dbuser', 'mypassword', 'mydb')
     
    cur = con.cursor()
    sql = "SELECT ID FROM articles ORDER BY ID DESC LIMIT 10"
    cur.execute(sql)
    for i in range(cur.rowcount):
        row = cur.fetchone()
        print row[0]
 
except mdb.Error, e:
    print "Error %d: %s" % (e.args[0], e.args[1])
    sys.exit(1)


python의 dictionary type cursor를 이용하시려면 cursor 생성시에 다음과 같이 하시면 됩니다.

1
cur = con.cursor(mdb.cursors.DictCursor)


반응형
반응형
python 에 mysql 을 물리기 위해서 많은 자료를 찾아보았는데
다들 제대로 되어있지 않은 자료가 많아서 여기에 정리를 해둔다.

일단 기본적으로 http://sourceforge.net/projects/mysql-python 에서 압축 파일을 받아서 설치해라고 한다. 하지만 나같은 경우에는 받아서 설치를 할 경우에 mysql_config 파일이 존재하지 않는다고 떠서 꽤나 고생을 먹었다.

mysql_config 파일의 파일명은 my.cnf 이다. 찾을려면
find / -name my.cnf 로 찾아라. mysql_config 백날 찾아도 나오지 않는다.
그러하다 ! 그랬던 것이었다 !!!

근데 이렇게 해도 제대로 설치가 안되서 더 삽질을 가한 결과

apt-cache search python-mysql 을 검색해본 결과

python-mysqldb 라는 것이 보였다. 이것을 설치해본 결과 에러없이 내가 원하던 기능을 작동하는 것을 보았다.... 아 할레루야 한시간동안 삽질했다. 


http://noveljava.tistory.com/49


반응형
반응형
http://www.developerfusion.com/tools/convert/vb-to-csharp/


http://www.carlosag.net/Tools/CodeTranslator/


반응형

'Program > C#' 카테고리의 다른 글

Array 배열 예제  (0) 2015.08.19
닷넷!! All-In-One Code Framework!!  (0) 2011.03.24
.NET 개발자를 위한 무료 소프트웨어  (0) 2011.03.24
디렉토리 안에 폴더 삭제 하기  (0) 2011.03.24
다중서버관리  (0) 2011.03.24
반응형

닷넷 하시는 분이라면 아주 유용할 만한 소스인거 같아서 여러분들도 보시라고
올려 드립니다. All-In-One Code Framework 아주 멋지게 잘 만들어 놓은
소스코드네요 ^^

반응형

'Program > C#' 카테고리의 다른 글

Array 배열 예제  (0) 2015.08.19
c# vb 변환  (0) 2011.10.26
.NET 개발자를 위한 무료 소프트웨어  (0) 2011.03.24
디렉토리 안에 폴더 삭제 하기  (0) 2011.03.24
다중서버관리  (0) 2011.03.24
반응형
반응형

'Program > C#' 카테고리의 다른 글

c# vb 변환  (0) 2011.10.26
닷넷!! All-In-One Code Framework!!  (0) 2011.03.24
디렉토리 안에 폴더 삭제 하기  (0) 2011.03.24
다중서버관리  (0) 2011.03.24
파일 백업 툴 FileSyncer  (0) 2011.03.24
반응형

DirectoryInfo dir = new DirectoryInfo(폴더경로);
FileInfo[] files = dir.GetFiles();
foreach(FileINfo F in files)
{
F.Delete();
}
출처 : Tong - centerkjh님의 Visual C#통

폴더 삭제 하기

* 읽기 전용 파일 포함 디렉토리 삭제 방법

using System.IO;
protected void DeleteTempDirectory()
{
DirectoryInfo tempDirInfo = new DirectoryInfo("temp");

if (tempDirInfo.Exists == true)
{
foreach (DirectoryInfo di in tempDirInfo.GetDirectories())
{
foreach (FileInfo fi in di.GetFiles())
{
if ( (fi.Attributes & FileAttributes.ReadOnly) > 0 )
{
fi.Attributes = FileAttributes.Normal;
}
}
}

tempDirInfo.Delete(true);
}
}

반응형

'Program > C#' 카테고리의 다른 글

닷넷!! All-In-One Code Framework!!  (0) 2011.03.24
.NET 개발자를 위한 무료 소프트웨어  (0) 2011.03.24
다중서버관리  (0) 2011.03.24
파일 백업 툴 FileSyncer  (0) 2011.03.24
레지스트리 값 읽고, 쓰기 방법 2  (0) 2011.03.24
반응형


위 그럼 처럼 다중서버 관리를 할수가 있다...

이걸 가지고 여러므로 유용하실 쓸수 있을듯한 느낌이 팍팍? ^^

반응형
반응형


[출처] 파일 백업 툴 FileSyncer 2.0 - C# 소스 공개|작성자 http://wiz.pe.kr/trackback/599 (위즈군의 라이프로그)

몇 년 전에 개인적으로 데이터 백업을 위해 만들어서 사용하던 프로그램의 소스입니다.
생각보다 많은 분들이 소스를 요청 하셔서 공개를 합니다.
처음부터 소스 공개를 목적으로 만든 프로그램이 아니라서 소스의 상태가 깔끔하지는 않습니다.
개인적으로 사용 할 목적이었기 때문에 UI 역시 불편하게 구성되어 있네요.
이 프로그램을 참고해서 더 깔끔하고 좋은 프로그램을 만들어 주시면 좋겠다는 생각입니다.


FileSyncer 2.0

소스다운로드
개발환경 : Microsoft .NET Framework 2.0 / Visual Studio 2003 / C#
실행파일 다운로드 : "개인용으로 개발한 (데이터백업)싱크 프로그램 Wiz FileSyncer 2.0"

프로그램에 대한 소개 내용은 "개인용으로 개발한 (데이터백업)싱크 프로그램 Wiz FileSyncer 2.0"를 참고하세요.
다운로드 시 주의 사항
* 상업적 사용 금지 : 혹시라도 상업적 목적으로 개발 할 경우 미리 연락을 주세요.
* 재배포 금지 : 원본 소스를 재배포하지 말아주세요.
* 수정 프로그램을 배포하는 경우는 꼭 알려주세요. (저도 참고를 하고 싶습니다.)
반응형
반응형

using Microsoft.Win32; // RegistryKey 사용을 위해 추가

namespace RegTest
{
public partial class Form1 : Form
{
public Form1()
{
InitializeComponent();
}

// 레지스트리 가져오기
private string getReg(string regVal)
{
RegistryKey reg = Registry.LocalMachine;
reg = reg.OpenSubKey("Software\\myProgram", true);
if (reg == null)
return "";
else
return Convert.ToString(reg.GetValue(regVal)); // 값 검색
}

// 레지스트리 쓰기
private void setReg(string regKey, string regVal)
{
RegistryKey reg = Registry.LocalMachine;
reg = reg.CreateSubKey("Software\\myProgram",
RegistryKeyPermissionCheck.ReadWriteSubTree);
reg.SetValue(regKey, regVal, RegistryValueKind.String);
reg.Close();
}

// 등록 버튼
private void button1_Click(object sender, EventArgs e)
{
string regKey = textBox1.Text;
string regVal = textBox2.Text;

setReg(regKey, regVal);

}

// 읽기 버튼
private void button2_Click(object sender, EventArgs e)
{
string regKey = textBox1.Text;
textBox2.Text = getReg(regKey);
}
}
}

반응형
반응형

using System;
using System.Collections.Generic;
using System.Text;
using Microsoft.Win32; // 레지스트리관련 클래스를 쓰기위해 추가

namespace regiEx1
{
class Program
{
static void Main(string[] args)
{
string regSubkey = "Software\\myTestKey";
// 서브키를 얻어온다. 없으면 null
RegistryKey rk = Registry.LocalMachine.OpenSubKey(regSubkey, true);
// 없으면 서브키를 만든다.
if (rk == null)
{
// 해당이름으로 서브키 생성
rk = Registry.LocalMachine.CreateSubKey(regSubkey);
}
string[] strData = new string[] {"aaa","bbb","ccc"};
// 서브키 아래 값 쓰기
rk.SetValue("test", strData);
// 서브키 아래 값 읽기
string[] regStr = rk.GetValue("test") as string[];

Console.WriteLine(regStr[1]);
Console.ReadLine();

// 서브키 삭제
Registry.LocalMachine.DeleteSubKey(regSubkey);
}
}
}

반응형
반응형

C# 프로그래밍을 하다보면 C++에서 만들어 둔 DLL을 사용해야 할 경우가 많이 있지요.
in 기능의 인수들을 그냥 대충 바꾸면 되는데
out 기능의 포인터를 사용한 Call by Referance 인수들을 참 난감합니다.
그러나 아래와 같이 선언하면 사용이 가능합니다.
참고 하세요.

using System;
using System.Collections.Generic;
using System.Text;
using System.Runtime.InteropServices;

namespace SolarCellDGUI
{
class SCMInterface
{

[DllImport!("P:SolarCell_CTCShellExecDllsSCMBusClient.dll")]
public static extern int ConnectToSCM(string MyIPAddr,
[MarshalAs(UnmanagedType.LPArray)] Int32[] ConnectionID,
[MarshalAs(UnmanagedType.LPArray)] byte[] EquipmentName);

[DllImport!("P:SolarCell_CTCShellExecDllsSCMBusClient.dll")]
public static extern int DisconnectFromSCM(string MyIPAddr, int ConnetionID);

[DllImport!("P:SolarCell_CTCShellExecDllsSCMBusClient.dll")]
public static extern int SendEventToSCM(int ConnectionID, string Source,
string Destination, string EventName, string EventData, int EventDataLen,
[MarshalAs(UnmanagedType.LPArray)] byte[] ResultData,
[MarshalAs(UnmanagedType.LPArray)] Int32[] ResultDataLen);


public bool SendEventSCM(int ConnectionID, string Source, string Destination,
string EventName, string EventData, int EventDataLen, ref string ResultData, ref int ResultDataLen)
{
int res = 0;
byte[] resData = new byte[100];
Int32[] resDataLen = new Int32[1];
char[] tempchr = new char[100];
int i;

res = SendEventToSCM(ConnectionID, Source, Destination, EventName, EventData,
EventDataLen, resData, resDataLen);

if (res == 1)
{
ResultDataLen = resDataLen[0];

for (i = 0; i < 100; i ++)
tempchr[i] = System.Convert.ToChar(resData[i]);
ResultData = new string(tempchr);
return true;
}
else
{
return false;
}

}

public bool ConnectSCM(string MyIPAddr, ref int ConnectionID, ref string EquipmentName)
{
int res = 0;
byte[] eqpName = new byte[80];
Int32[] conID = new Int32[1];
char[] tempchr = new char[80];
int i;

res = ConnectToSCM(MyIPAddr, conID, eqpName);

if (res == 1)
{
ConnectionID = conID[0];

for (i = 0; i < 80; i++)
tempchr[i] = System.Convert.ToChar(eqpName[i]);

EquipmentName = new string(tempchr);
return true;
}
else
{
return false;
}

}

public bool DisconnectSCM(string MyIPAddr, int ConnetionID)
{
int res = 0;

res = DisconnectFromSCM(MyIPAddr, ConnetionID);

if (res == 1)
return true;
else
return false;
}

}
}

반응형

'Program > C#' 카테고리의 다른 글

레지스트리 값 읽고, 쓰기 방법 2  (0) 2011.03.24
레지스트리에 값 읽고, 쓰고, 삭제  (0) 2011.03.24
C#에서 Win32 API 사용하기2  (0) 2011.03.24
웹페이지 자동로그인 구현  (0) 2011.03.24
급여 계산  (0) 2011.03.24
반응형

C#에서 Win32 API 사용하기

개요

Win32 API를 불러올 때, 함수의 명칭, 인자, 리턴 값을 가지고 불러오게 되어 있다. 하지만, C#에서 타입들이 모두 객체(Object)의 형식이며, 일반적인 C 의 데이터 형과 상이한 모양을 가진다. 이러한 문제들을 해결할 수 있는 것이 PInvoke 기능이다.

PInvoke( Platform Invocation Service)는 관리화 코드에서 비관리화 코드를 호출할 방법을 제공한다. 일반적인 용도는 Win32 API의 호출을 위해 사용한다.

namespace PinvokeExample

{

using System;

using System.Runtime.InteropServices; // 반드시 입력해야 한다.

public class Win32

{

[DllImport!(“user32.dll”)]

public static extern int FindWindow(string a, string b);

}

}

위 예제는 FindWindow라는 user32.dll C함수를 사용하는 모습을 보여주고 있다. 실제 FindWindow의 선언은 다음과 같다.

HWND FindWindow(LPCSTR swClassName, LPCSTR swTitle);

HWND는 윈도우 핸들을 표현하는 32비트 정수 이므로, int형으로 치환되고 LPCSTR 형은 NULL로 끝나는 문자열을 표현한다. 이때 PInvoke string을 자동으로 LPCSTR로 치환해 주는 역할을 하게 된다.

이 문서에서는 이처럼 Win32 API 함수의 여러 유형들을 어떻게 C#에서 사용 할 것인지에 대하여 알아보자.

WIN32 데이터형의 치환

Win32 API에서 일반적으로 사용하고 있는 데이터형은 모두 C#의 데이터 형으로 치환될 수 있다.

Win32 API TYPE

C#

BOOL, BOOLEAN

bool

BYTE

byte

CALLBACK

delegate

COLORREF

int

DWORD

int

DWORD_PTR

long

DWORD32

uint

DWORD64

ulong

FLOAT

float

HACCEL

int

HANDLE

int

HBITMAP

int

HBRUSH

int

HCONV

int

(모든 HANDLE 타입) Hxxxx

int

LPARAM

long

LPCSTR

[in] string [out] StringBuilder

LPBOOL

ref bool

이외 LP*

ref 형식

UINT

uint

Uxxxx

unsigned 타입들..

WORD

Short

WPARAM

Uint

Structure 의 전달

예를 들어 POINT 형의 경우,

typedef struct t_Point {

int x;

int y;

} POINT;

이것은 기본적으로 다음과 같이 선언될 수 있다.

[순차적]

[StructLayout(LayoutKind.Sequential)]
public struct Point {
      public int x;
      public int y;
}

[명시적]

[StructLayout(LayoutKind.Explicit)]
public struct Point {
      [FieldOffset(0)] public int x;
      [FieldOffset(4)] public int y;
}

일차적으로 할당되는 메모리 레이아웃이 동일하다면, C#에서 바로 받아 들이 수 있다.

// BOOL SetWindowPos(POINT pos); 이런 함수가 있다고 가정하면… ^^

[DllImport! (“user32.dll”)]

public static extern bool SetWindowPos(Point pos);

사용할 함수 이름 바꾸기

여기서 함수의 이름을 바꿔서 사용하고 싶다면 다음과 같이 변경하면 된다.

// BOOL SetWindowPos(POINT pos);

[DllImport! (“user32.dll”, EntryPoint = “SetWindowPos”)]

public static extern bool ShowAt(Point pos);

레퍼런스형 전달하기

LPPOINT형은 POINT의 포인터 형이므로 ref Point와 같이 사용 할 수 있다. 실제 사용하는 형식은 다음과 같다.

C 언어의 포인터의 경우 레퍼런스로 사용하려고 하면, ref 키워드를 사용하는 방법이 있다.

// BOOL SetWindowPos(HWND hWnd, LPRECT lpRect);

[DllImport!(“user32.dll”)]

public static extern bool SetWindowPos(int hWnd, ref Rect lpRect);

Out형 함수 인자 사용하기

MSDN 같은 곳에서 함수의 선언을 살펴보면 다음과 같은 형식의 함수를 볼 수 있을 것이다. 이러한 형식은 레퍼런스 형으로 결과를 함수의 인자에 보내겠다는 말이다. 이러한 형식은 Win32 API에서 많이 쓰이고 있고, 포인터를 사용하므로, 많은 주의를 기울여야 한다.

BOOL GetWindowRect(
  HWND hWnd,      // handle to window
  LPRECT lpRect   // window coordinates
);

Parameters

hWnd

[in] Handle to the window.

lpRect

[out] Pointer to a RECT structure that receives the screen coordinates of the upper-left and lower-right corners of the window.

여기서 LPRECT는 앞 절에서 설명한 Structure의 전달을 참고하여 치환 될 수 있다.

여기서 lpRect RECT의 포인터이며, GetWindowRect 함수 내에서 이 포인터에 직접 값을 쓰게 되어 있다. 즉 이 포인터는 값을 기록하기 위한 인자이지, 값을 전달하기 위한 인자는 아닌 것이다. 이것은 또 다른 C# 레퍼런스 연산자인 out 키워드를 사용하여 쉽게 해결 할 수 있다.

public static extern bool GetwindowRect(int hWnd, out Rect lpRect);

실제 사용하는 모습은 다음과 같다.

public static extern bool GetWindowRect(int hWnd, out Rect lpRect);

public static void UseFunction() {

Rect _rect; // 값을 대입하지 않아도 된다.

Win32.GetWindowRect(hwnd, out _rect);

}

참고로 ref 키워드는 입력과 출력 둘 다 사용 할 수 있다. 그러나 ref를 사용하는 변수가 값이 설정되어 있다는 가정을 하고 있으므로, 이전에 반드시 어떠한 값을 입력해야 한다.

실제 사용 예는 다음과 같다.

public static extern bool GetWindowRect(int hWnd, ref Rect lpRect);

public static void UseFunction() {

Rect _rect = new Rect(); // 꼭 값을 대입해야 한다.

_rect.top = 20; _rect.left = 30;

_rect.bottom = 50; _rect.right = 60;

Win32.GetWindowRect(hwnd, ref _rect);

}

여기서 잠깐

대중없이 Rect라는 구조체가 나오는데 이는 API에서 RECT형을 C#으로 바꾸어 사용하는 structure이다. 앞의 예제들은 다음과 같은 선언을 하였다고 가정한다.

[StructLayout(LayoutKind.Explicit)]
public struct Point {
      [FieldOffset(0)] public int top;
[FieldOffset(4)] public int left;
[FieldOffset(8)] public int bottom;
[FieldOffset(12)] public int right;

}

CALLBACK 함수의 선언

C 언어에서 콜백 함수는 함수 포인터로 존재하게 된다. 이것은 함수 인스턴스의 포인터로, 함수 자체를 전달하게 되는 방식이다. 대표적으로 사용되는 부분은 EnumWindows 함수이다.

// BOOL EnumWindows(WNDENUMPROC lpEnumFunc, LPARMAM IParam)

이 함수는 현재 열려 있는 모든 윈도우 핸들을 열거하기 위한 함수로 실제 처리하는 부분은 함수 포인터, 즉 콜백함수인 lpEnumFunc에서 처리하게 되어 있다. WNDENUMPROC 타입의 선언은 다음과 같다.

// typedef BOOL (CALLBACK* WNDENUMPROC)(HWND, LPARAM);

public delegate bool Callback(int hWnd, long lParam);

이러한 콜백 함수 역할을 하는 C#의 프리미티브는 delegate이다. CALLBACK delegate로 지환된다.

결과적으로 다음과 같이 사용하게 된다.

namespace ada.appshare

{

public delegate bool Callback(int hwnd, int lParam);

internal class Win32

{

internal static extern int EnumWindows(CallBack x, int y);

[DllImport!("user32.dll")]

public static bool EnumWindowsCallback(int hWnd, int lParam)
{

System.Console.WriteLine(“” + hWnd);

return true;

}

}

public static void Main(String []args)

{

Win32.Callback call
= new Win32.Callback(Win32.EnumWindowsCallback);

Win32.EnumWindows(call, 0);

}

}

반응형

+ Recent posts

반응형