http://www.tecmint.com/configure-zabbix-to-send-email-alerts-to-gmail/
This tutorial will briefly discuss you on how to setup Zabbix server to send mail reports to a Gmailaddress by using SSMTP program, without the need to install and configure any local MTA daemon, such as Postfix, Exim etc.
Requirements
Step 1: Install and Configure SSMTP
1. SSMTP is a small software, which does not fulfill any of the functionality of a mail server, but only delivers emails from a local machine to an external email address on a mailhub.
To install SSMTP program alongside with mailutils package that you will use it to send mails, issue the following command on your RedHat and Debian like server:
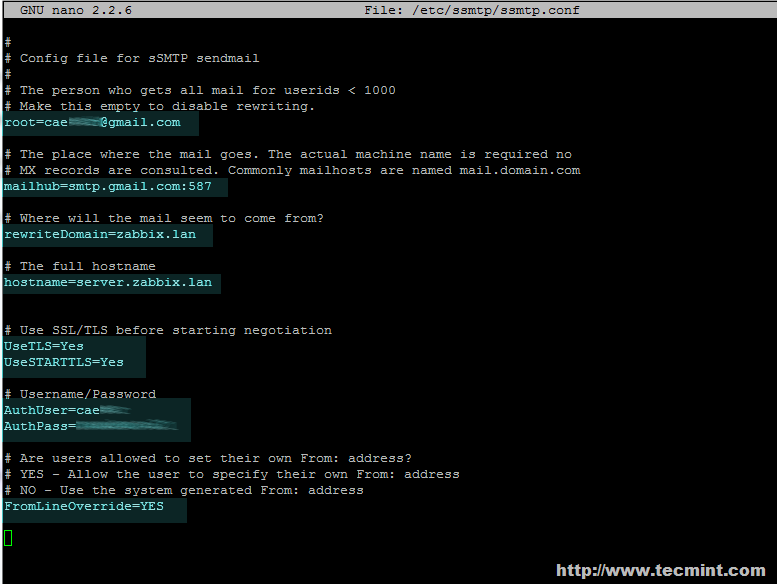
2. After the packages are installed on the system, configure SSMTP program to send local emails to your Gmail account by opening the main configuration file for editing with your favorite text editor and root privileges and use the following parameter settings:
SSMTP settings for GMAIL account
Configure Zabbix Email Alerts
Step 2: Gmail Tests for Zabbix Email Alerts
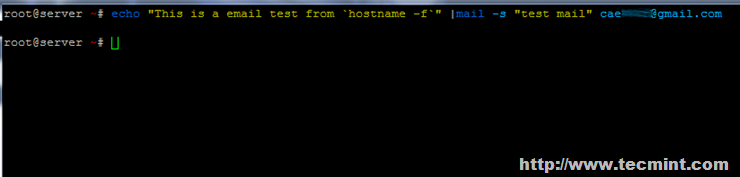
3. On the next step it’s time to send a local generated email to Gmail account by issuing the below command.
Gmail Tests
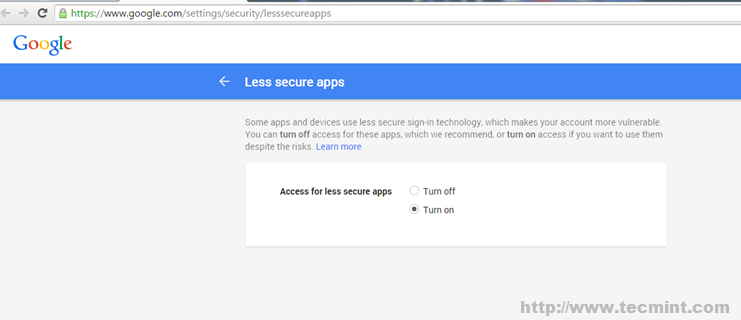
4. Normally, Gmail prevents different types of authentications to their servers from your account, so, in case you get the error “mail: cannot send message: Process exited with non-zero status”, then login to your Gmail account from browser and navigate to the following linkhttps://www.google.com/settings/security/lesssecureapps in order to allow access for less secure apps as in the following screen.
Manage Secure Gmail Apps
5. After you have turned on Less Secure Apps feature on your Gmail account, run the above mail command again and verify your Inbox after a few seconds to check if the locally generated email has been successfully delivered – you should normally see the email has incoming from Gmail.

Mail Delivery Confirm
Step 3: Configure Zabbix Sendmail Script
6. Further, based on the $(which mail) command create the following Bash script to Zabbixalertscripts directory with the following content and give it execute permissions:
Script content:

Configure Sendmail Zabbix
Next, set the execute permission on the script file.
7. Next, as previously, test the script functionality by sending a local email to Gmail account. The way to run the script with positional parameters is explained above:

Send Mail to Gmail Account
Afterwards, verify Gmail Inbox and check if the new local message has arrived.

Verify Mail Delivery
Step 4: Configure Zabbix to Send Alerts to Gmail
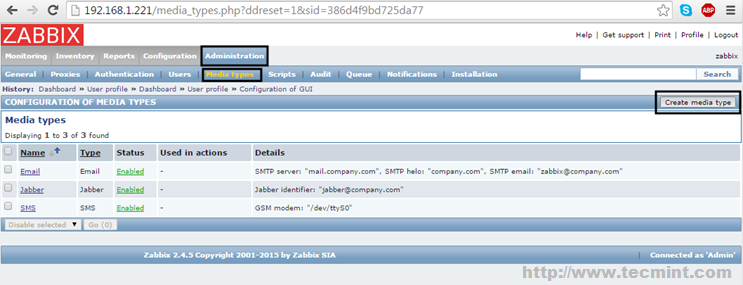
8. If the tests so far were successful, then you can move to next step and setup Zabbix to send generated email alerts to Gmail. First, login to Zabbix web interface and navigate to the following menu: Administration -> Media types -> Create media type.
Zabbix Administration
9. On the next screen enter an arbitrary Name to uniquely identify for the script in the Zabbixconfigurations (in this example Send-Email-Script is used), choose Script as Type from the list and enter the name of the Bash script created earlier (zabbix-sendmail used in this tutorial) to send email from command line (don’t use the path for the script, only the script name). When you’re done, hit the Add button below to reflect changes.

Create Zabbix Email Alerts
10. Further, let’s configure an email address to which you will send Zabbix alerts. Go to Profile ->Media -> Add and a new pop-up window should appear.
Here, select the name of the script that you have earlier named (in this example Send-Email-Scriptis used) for Type, enter the Gmail address to which you will send emails, choose the time period (week, hours) when email reports should be active for sending, choose the severity of the messages that you want to receive on your Gmail address, select Enabled as Status and hit the Addbutton to add the media. Finally hit the Update button to apply configuration.
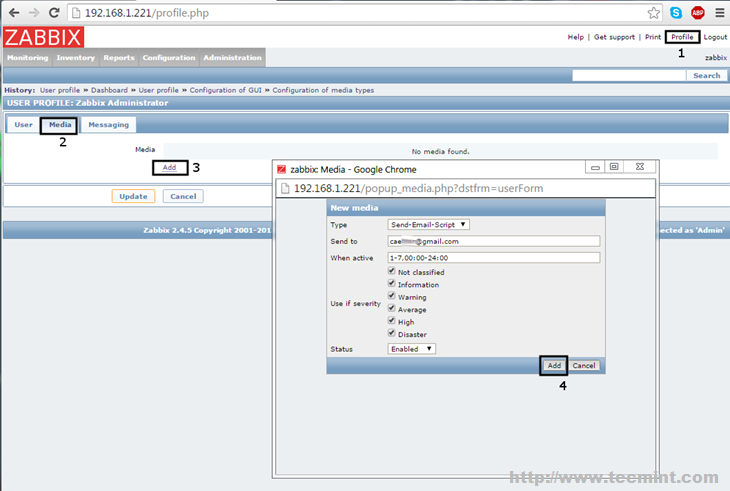
Configure Zabbix Mail Address
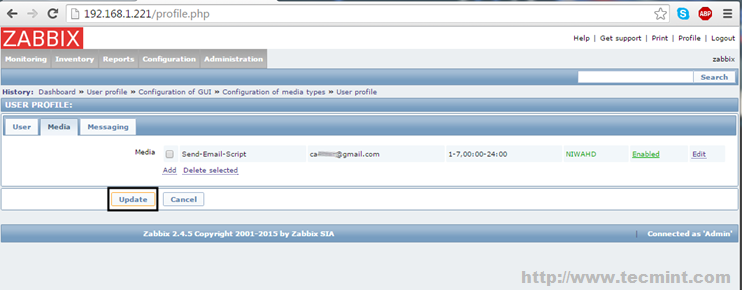
Zabbix Update Configuration
11. On the next step, enable the defult zabbix alerts by navigating to Configuration -> Actions, select as the Event Source – > Triggers from the right menu and hit on Disabled Status in order to enable it. Repeat the step for Event Source – > Internal or other custom created Actions and you’re done.
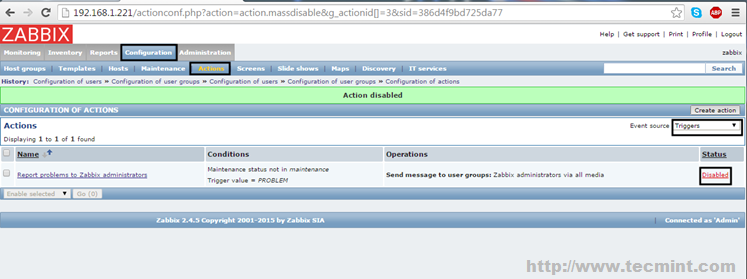
Enable Default Zabbix Mail Alert
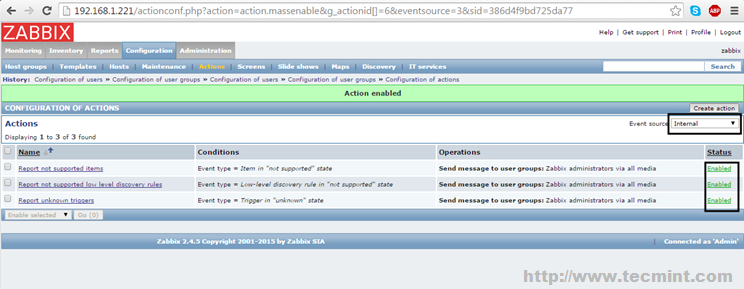
Zabbix Enabled Actions
Wait for a while for Zabbix to start gather information and generate some reports, then verify yourGmail Inbox and you should see some Zabbix alerts submitted so far.
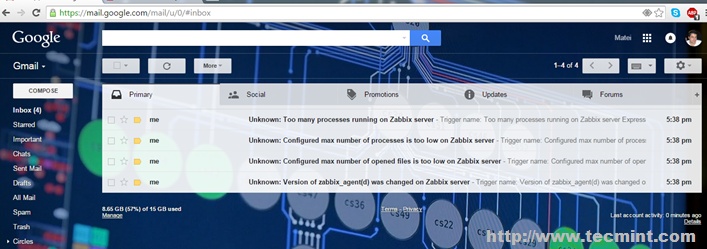
Zabbix Monitoring Mail Alerts
That’s all! Although this guide was mainly focused on sending Zabbix alerts to a Gmail account using Gmail SMTP server as a mailhub, using the same configuration you can, also, push zabbix email alerts further to other valid internet email accounts by relying on Gmail to route your emails through SMTP servers.
'연구개발 > Linux' 카테고리의 다른 글
| centos fdisk (0) | 2017.03.30 |
|---|---|
| ubuntu 방화벽 (0) | 2016.03.14 |
| swap (0) | 2016.03.02 |
| zabbix 3.0 설치 (0) | 2016.02.23 |
| zabbix 설치 (0) | 2015.11.17 |